shipgoods.

DOCUMENTATION

Everything, in one place

How Shipgoods works, how to connect your store, and every page of your dashboard explained. Each section has its own number — 6.4 is a link you can send straight to someone.

14 chapters · Updated September 2026

Chapter 01

How Shipgoods works

What we do, what you do, and where the line between the two sits.

1.1What we are

Shipgoods is the fulfilment side of your business. Your webshop stays exactly where it is — Shopify or WooCommerce. Orders that come in there arrive with us, and we source the product, quality-check it, pack it and ship it to your customer. You see the whole thing, and what it costs, in your dashboard at dashboard.shipgoods.eu.

You pay only the cost of goods: one all-in amount per order, taken off a balance you keep topped up. There is no separate fulfilment fee on your invoice and no subscription.

1.2The loop, in five steps

  1. 01A customer buysSomeone orders in your webshop and pays. Nothing for you to do.
  2. 02The order arrivesYour store is connected, so the order shows up in the dashboard by itself, usually within minutes. You can force it with SyncOrders.
  3. 03We source and packShipgoods buys the product, quality-checks it and packs it. The order status moves from Waiting Process to Processing.
  4. 04It shipsA tracking number is attached, the order becomes Trace Added, and the tracking is pushed back to your store so your customer gets a notification.
  5. 05You pay for itThe cost of the order comes off your balance. You keep the balance topped up.

1.3The four things you actually do

  • Watch your orders. Mostly you check that nothing is stuck — an address error, an unquoted product.
  • Get prices. Before we can fulfil a product it needs an agreed price. That is the Quotation section, chapter 8.
  • Keep your balance positive. Orders are paid from your balance, so you top it up in advance.
  • Look things up. Where is this parcel, what did that order cost, what did we charge last week.

1.4What the dashboard is not

It is not your webshop. Product descriptions, the prices your customers pay, marketing and refunds all stay in Shopify or WooCommerce. Changing something in the dashboard does not change your storefront.

1.5Our service levels

Dispatch
95% of paid, in-stock orders leave the warehouse within 24 hours.
Tracking
A tracking number is attached and pushed back to your store within 24 hours of dispatch.
Stock issues
If a product cannot be sourced, you hear it from us within 12 hours.
Support
WhatsApp and Slack during Chinese and European working hours.

Chapter 02

Connecting your Shopify store

Six steps, about five minutes. You create a private app in your own Shopify admin and send us its two keys.

2.1Before you start

You are going to create an app inside your own Shopify admin and give us its credentials. That lets us pull your orders in automatically and push tracking numbers back the moment a parcel leaves. You need to be the store owner, or a staff account with app permissions.

2.2Open app development

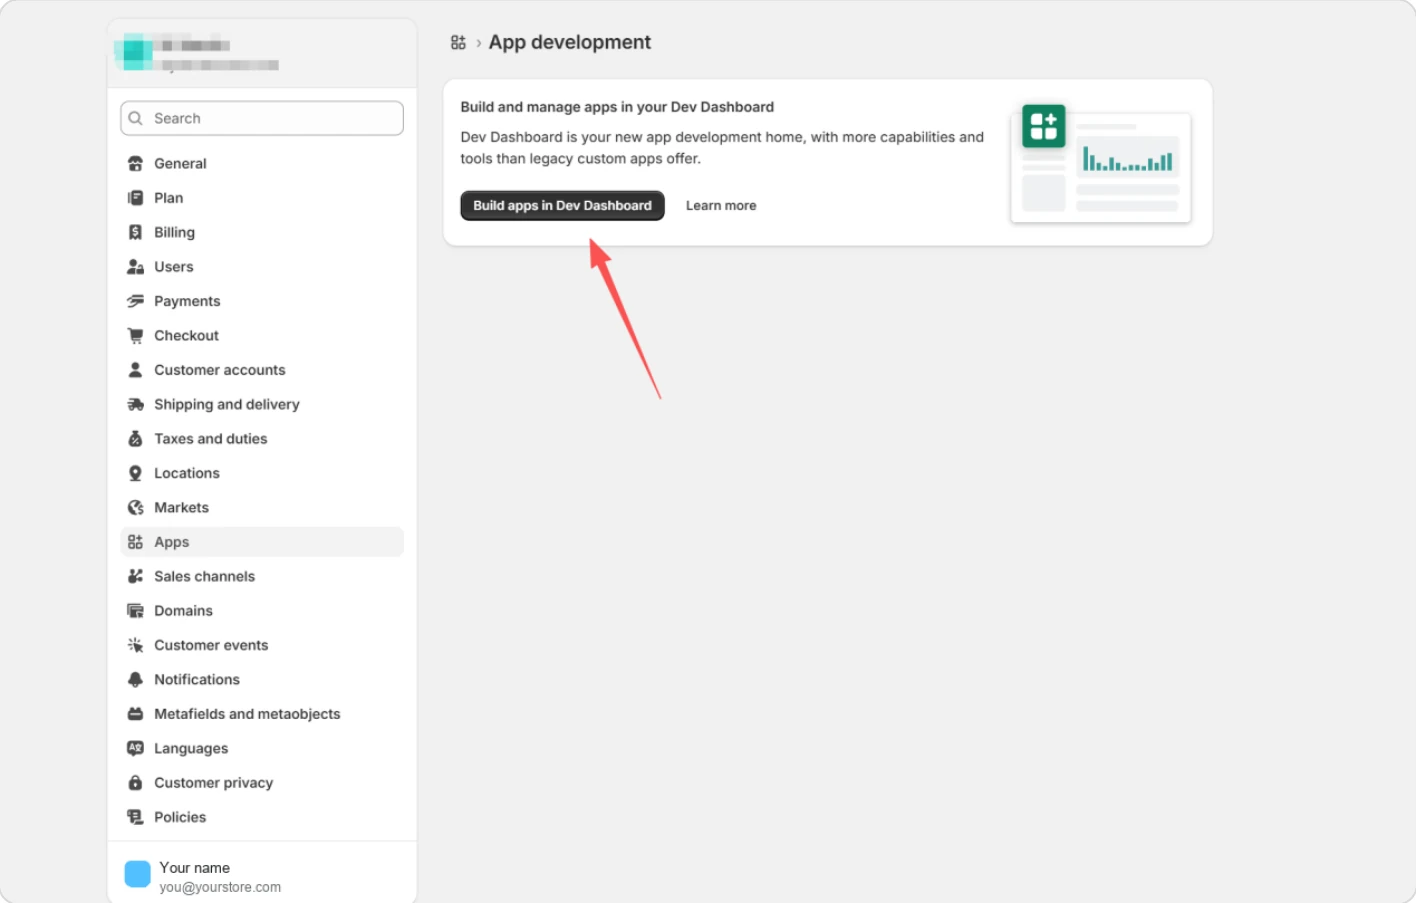
In your Shopify admin go to Settings, then Apps and sales channels, and click “Build apps in Dev Dashboard”.

Shopify settings, Apps and sales channels, with Build apps in Dev Dashboard highlighted
Settings → Apps and sales channels.

2.3Create the app and name it shipgoods

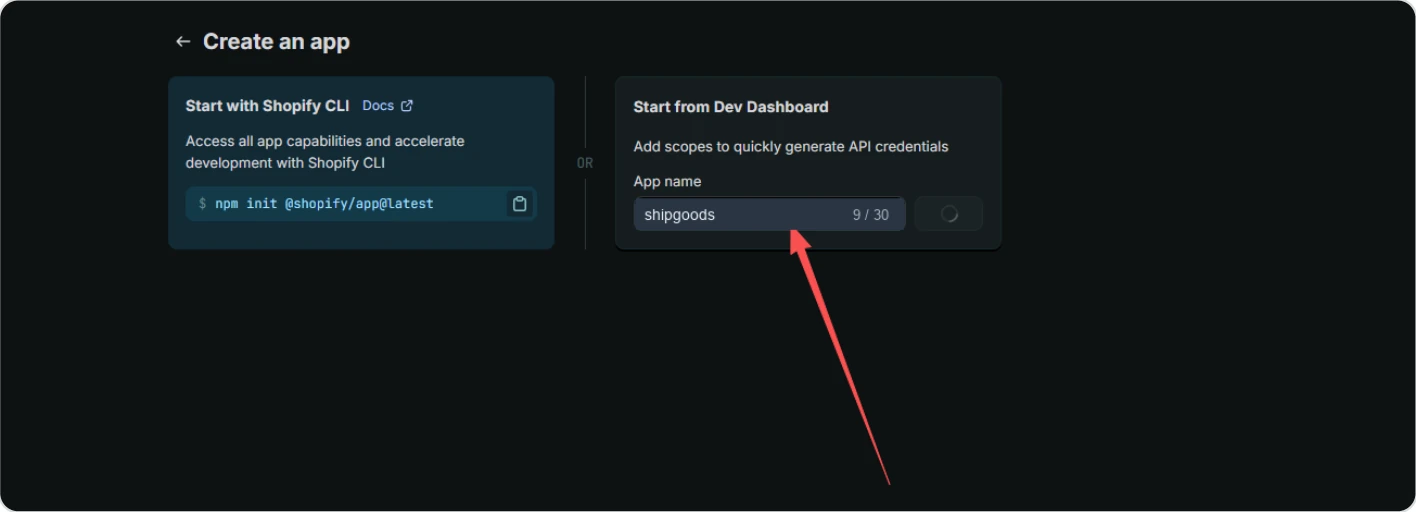
Under “Start from Dev Dashboard”, type shipgoods as the app name and create it.

Create an app screen with shipgoods typed as the app name
Create an app → Start from Dev Dashboard.

2.4Set the App URL

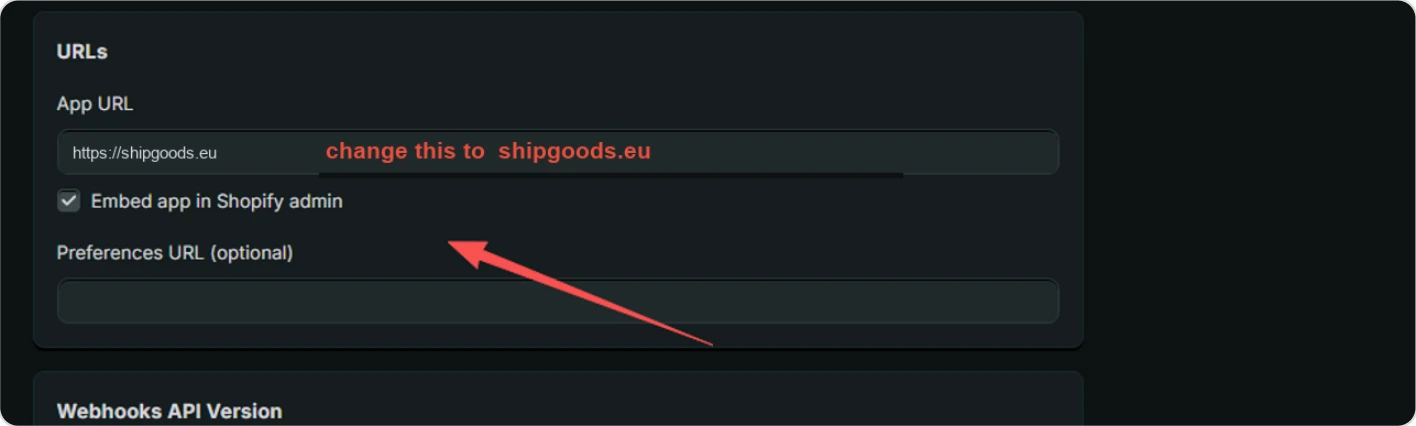
Change the App URL to https://shipgoods.eu and leave “Embed app in Shopify admin” ticked.

The URLs panel with the App URL set to shipgoods.eu
Configuration → URLs.

2.5Paste the access scopes

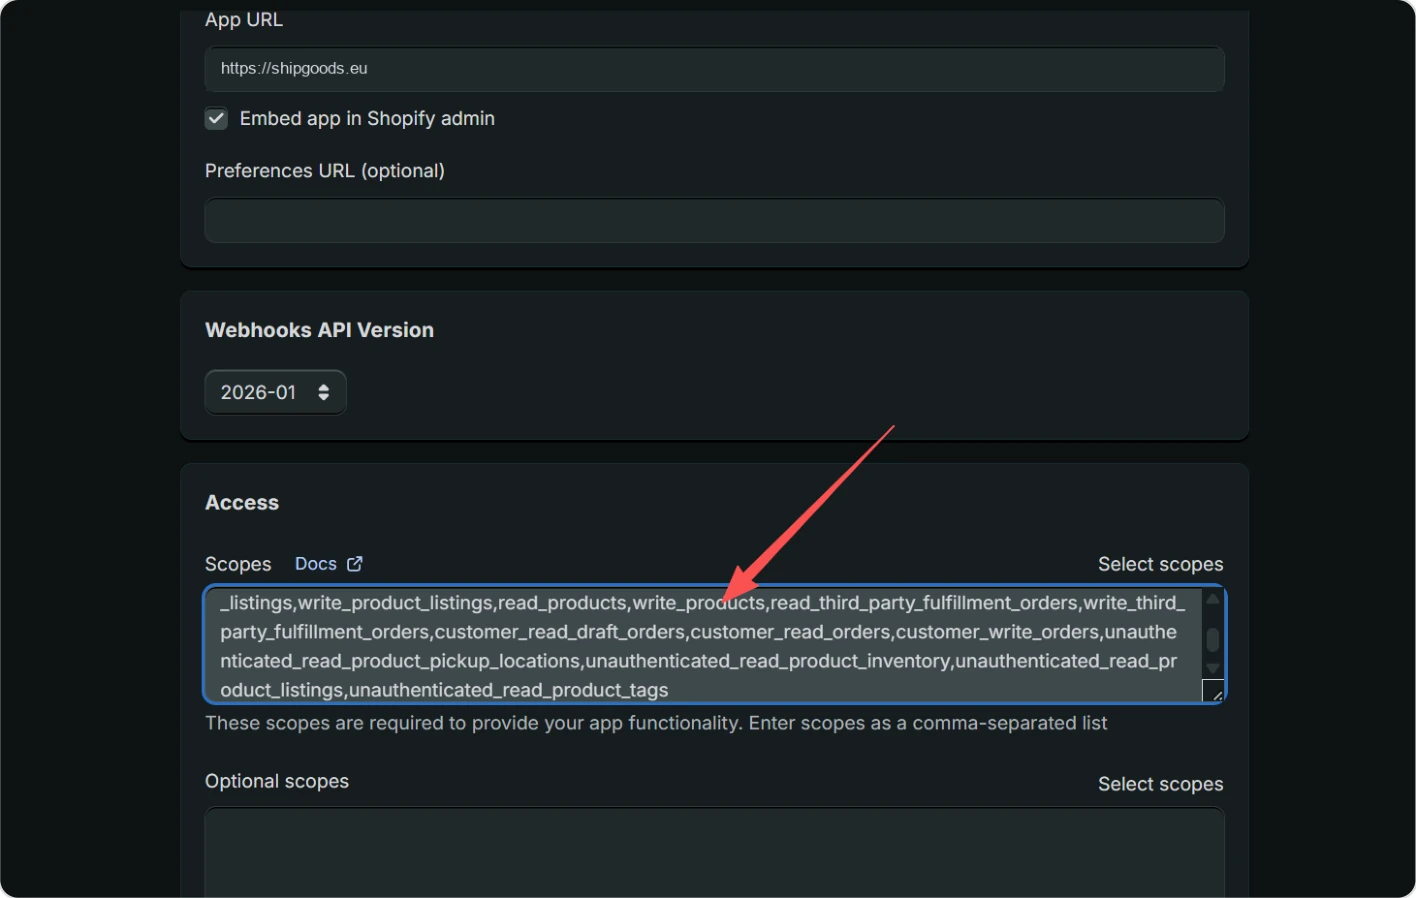
Scroll down to Access and paste the whole block below into the Scopes field. It is one line — copy all of it.

read_all_orders,read_assigned_fulfillment_orders,write_assigned_fulfillment_orders,read_custom_fulfillment_services,write_custom_fulfillment_services,read_customers,write_customers,read_customer_data_erasure,write_customer_data_erasure,write_draft_orders,read_draft_orders,read_fulfillment_constraint_rules,write_fulfillment_constraint_rules,read_fulfillments,write_fulfillments,write_inventory,read_inventory,write_locations,read_locations,read_merchant_managed_fulfillment_orders,write_merchant_managed_fulfillment_orders,write_order_edits,read_order_edits,read_orders,write_orders,read_product_feeds,write_product_feeds,read_product_listings,write_product_listings,read_products,write_products,read_third_party_fulfillment_orders,write_third_party_fulfillment_orders,customer_read_draft_orders,customer_read_orders,customer_write_orders,unauthenticated_read_product_pickup_locations,unauthenticated_read_product_inventory,unauthenticated_read_product_listings,unauthenticated_read_product_tags

The Access panel with the scope list pasted into the Scopes field
Configuration → Access → Scopes.

2.6Release the version

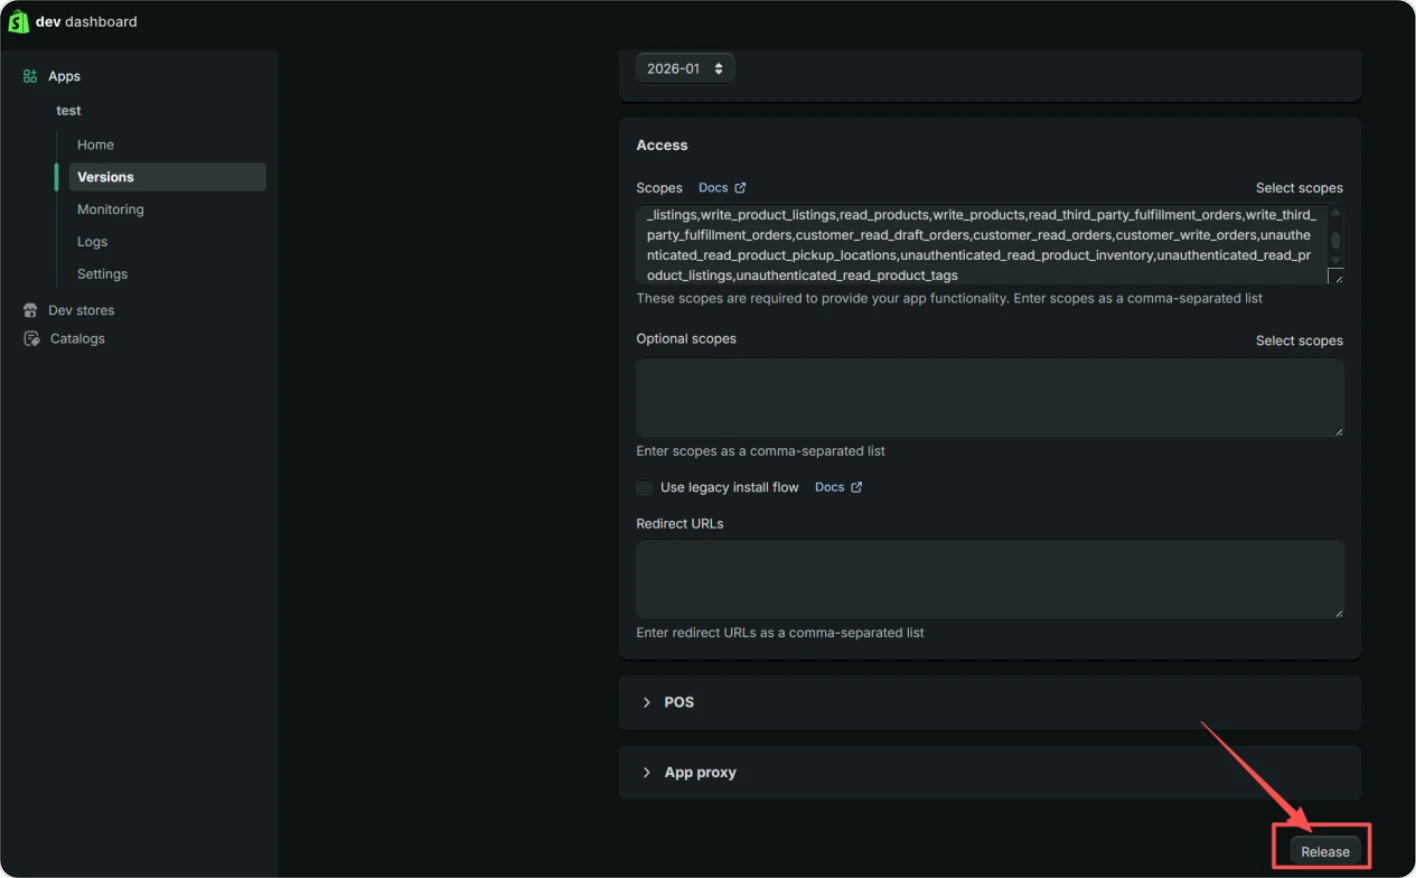
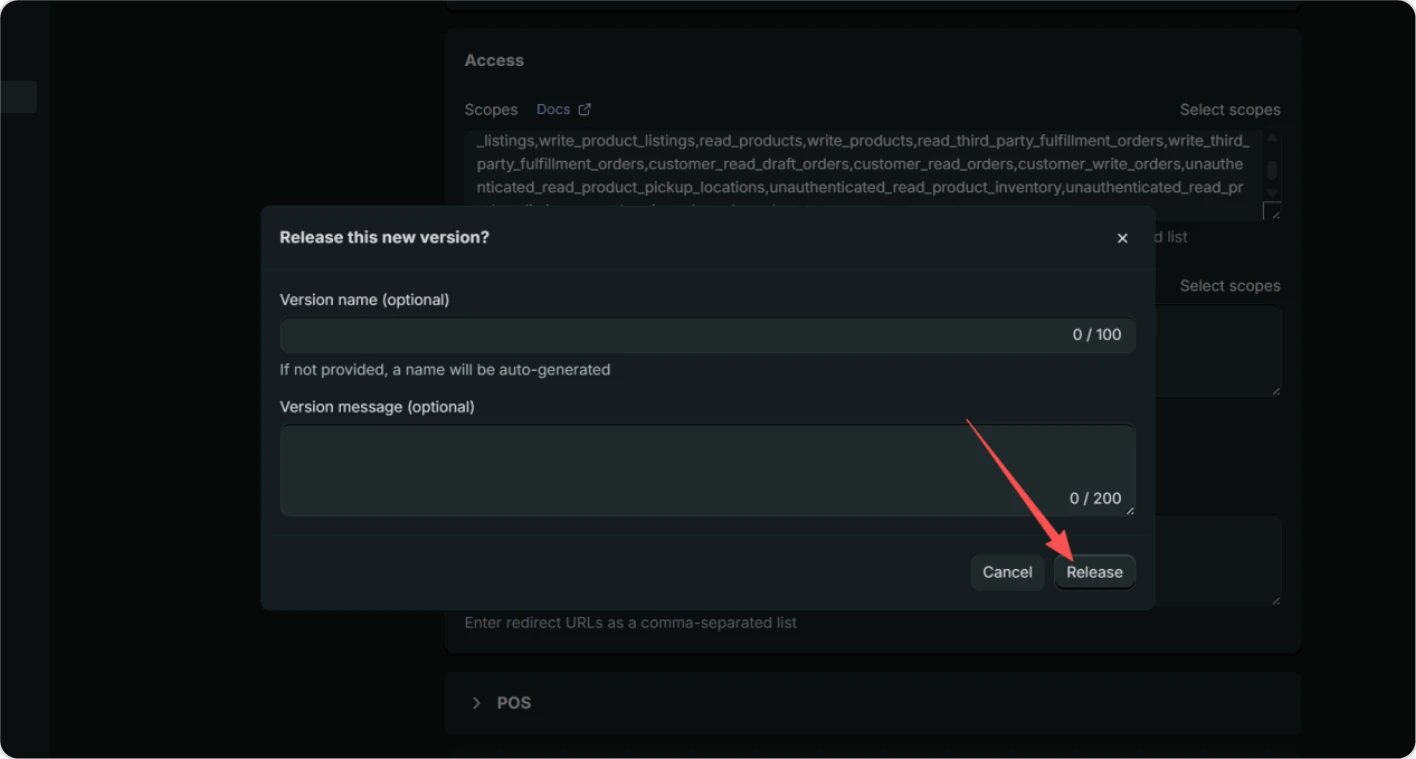
Click Release at the bottom right, then confirm with Release in the dialog. Nothing is live until you do this.

The Release button at the bottom right of the version screen
Versions → Release.
The Release this new version dialog with the confirm button
The confirmation dialog. Version name and message can stay empty.

2.7Send us the two keys

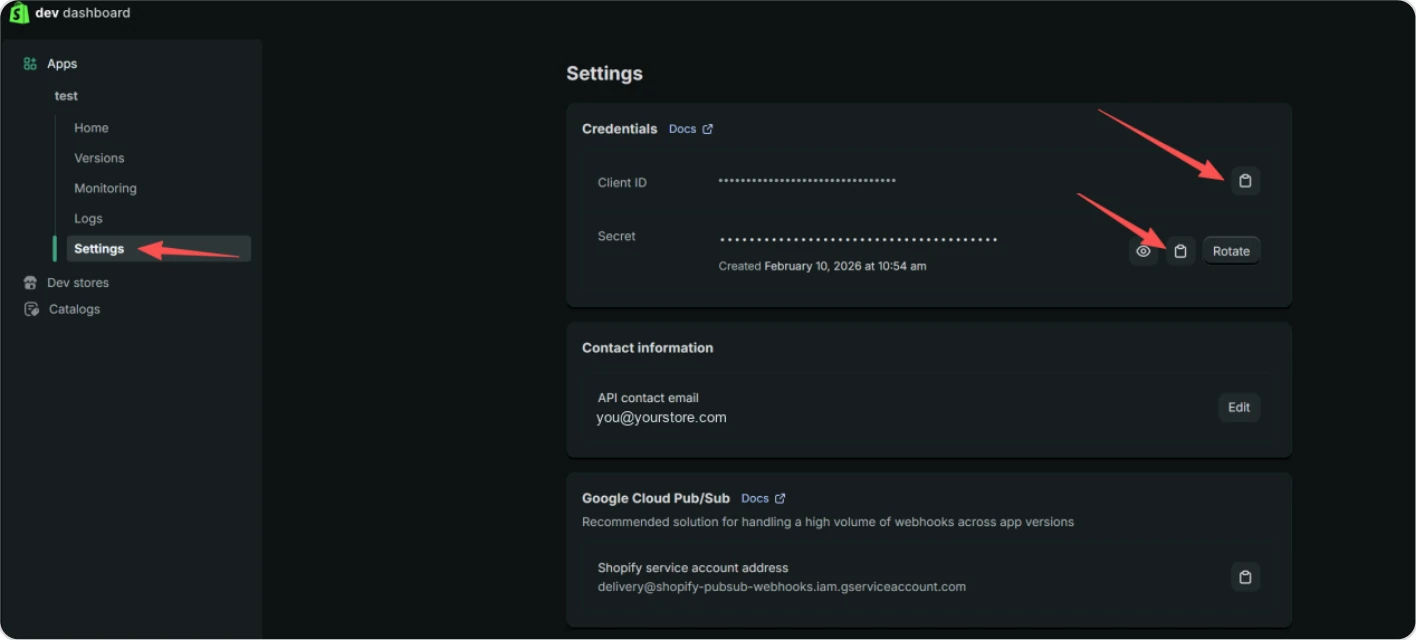
Open Settings in the left menu. Copy the Client ID and the Secret and send them to ship@shipgoods.eu.

The app Settings page showing the Client ID and Secret with copy buttons
Settings → Credentials.

Once we have the keys we connect your store on our side and confirm the same day. Stuck anywhere? Send a screenshot to ship@shipgoods.eu and we will walk you through it.

Chapter 03

Signing in

Where the dashboard lives and how to get into it.

3.1The login screen

Go to dashboard.shipgoods.eu. Your user name and password come from Shipgoods — there is no self-registration, and no “forgot password” link. If you are locked out, message your contact.

The Shipgoods dashboard login screen with user name, password and captcha fields
dashboard.shipgoods.eu — the only page you can reach while signed out.
  1. User name. Usually looks like SG_YourStore. It is not your email address.
  2. Password. Set by Shipgoods when your account was created. Ask us to change it if you want your own.
  3. Captcha. Type the characters from the image next to the box.
  4. Captcha image. Unreadable? Click the image and a fresh one loads.
  5. Login. A wrong captcha is the most common reason a login “just doesn't work” — try it again before assuming your password is wrong.

3.2One login per store account

Chapter 04

Finding your way around

Two pieces of furniture: the orange bar on top, and the menu down the left.

4.1The shell

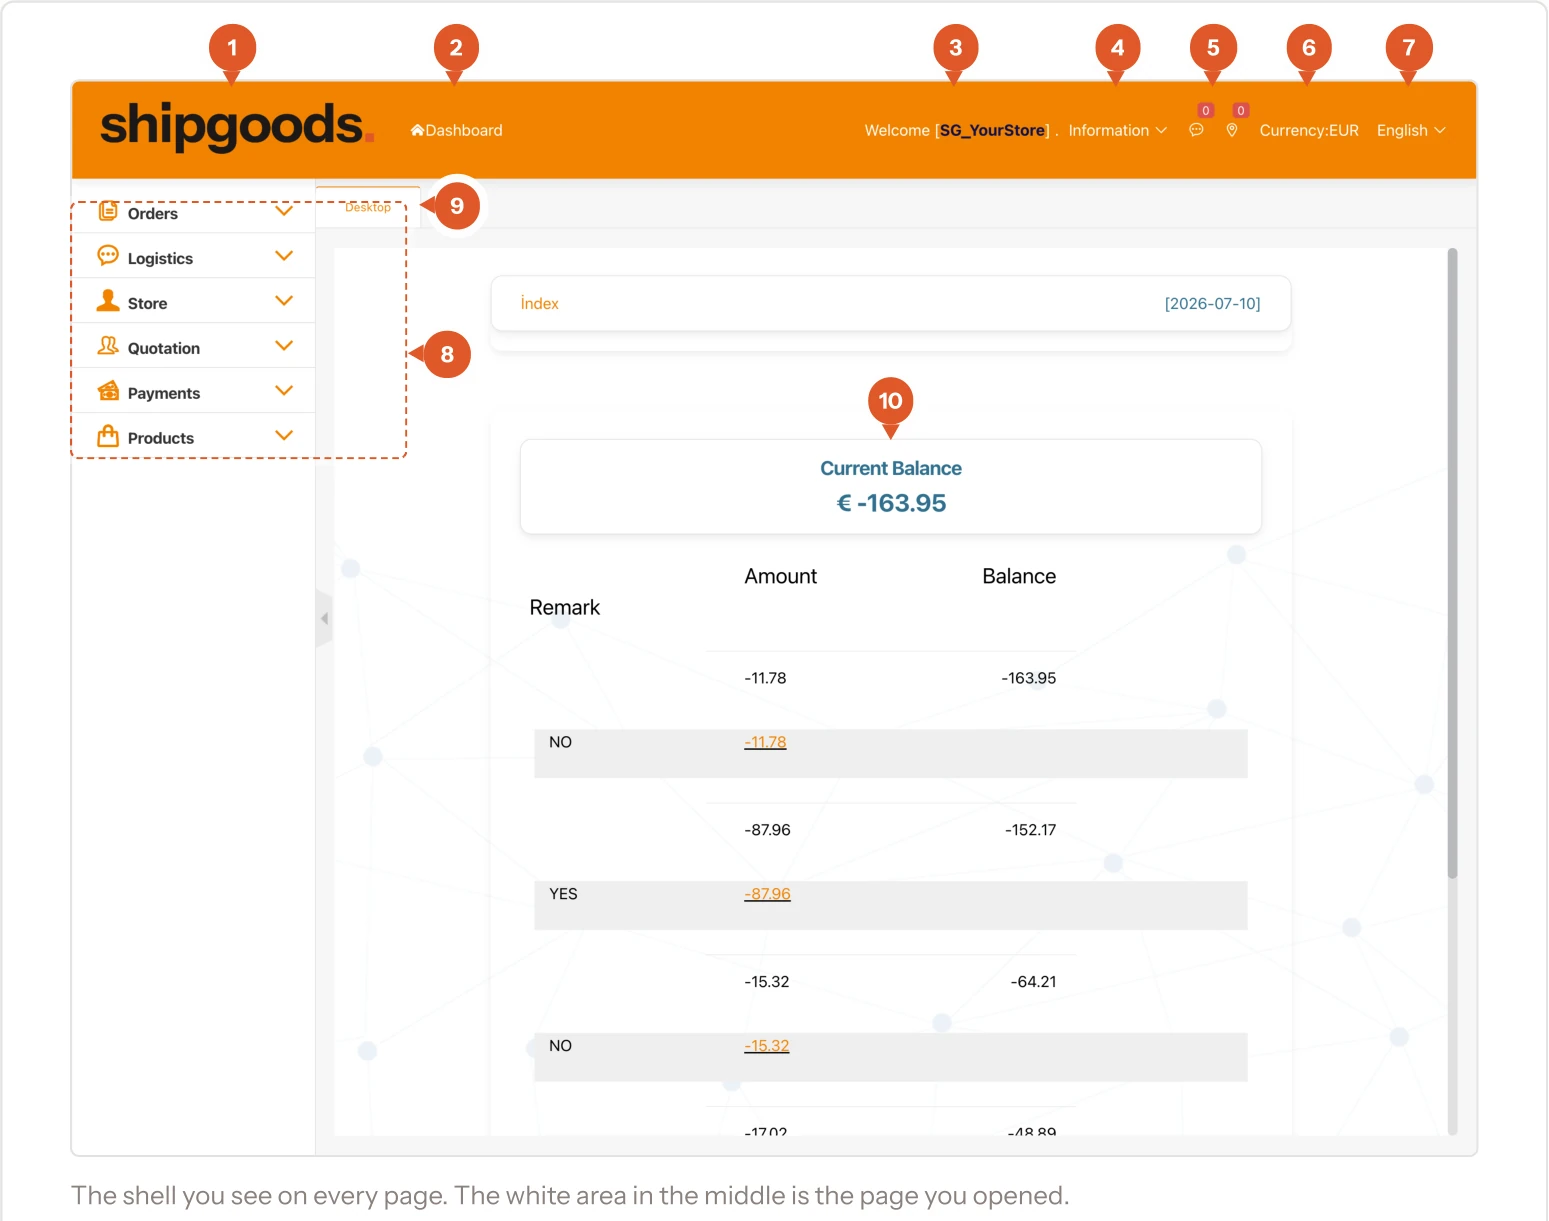
An orange bar across the top that never changes, and a menu down the left with six sections. Everything in this documentation lives in one of those six.

The dashboard shell: orange top bar, six-section menu on the left, page content in the middle
The shell you see on every page. The white area in the middle is the page you opened.
  1. Shipgoods logo. Click it to come back to the home screen from anywhere.
  2. Dashboard. Same thing — back to home.
  3. Welcome [your account]. Which account you are signed in as. Worth a glance if you manage more than one store.
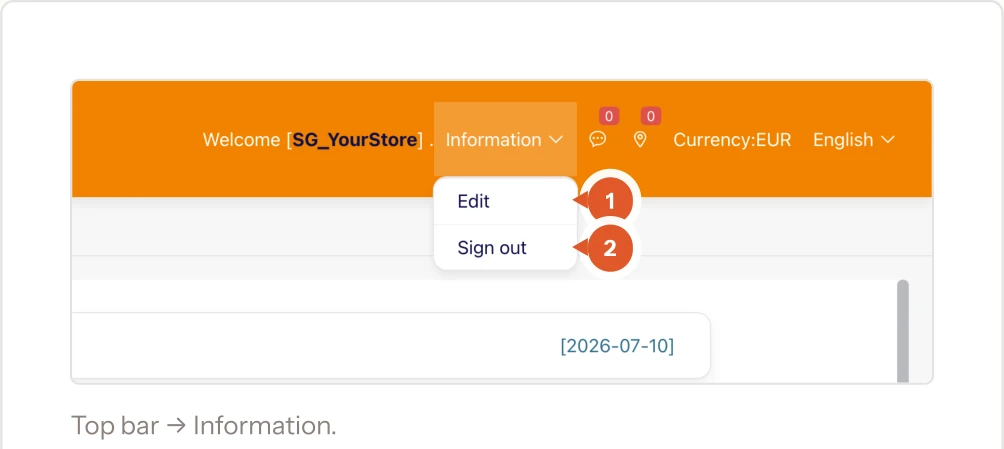
  4. Information. A small menu with Edit (your account details) and Sign out.
  5. Two counters. Unread order messages and address errors. A red number here means something is waiting for you.
  6. Currency. Your account is settled in euros. This is a display, not a switch.
  7. Language. Leave this on English — see 13.1 if your screen looks Dutch.
  8. The six menu sections. Click one to fold it open; the pages inside appear underneath.
  9. Tab strip. Pages open as tabs here, like a browser. Right-click a tab to close it.
  10. Your balance. The first thing on the home screen, and the number to watch.

4.2The Information menu

The Information dropdown in the top bar, with Edit and Sign out
Top bar → Information.
  1. Edit. Your account details and contact information.
  2. Sign out. Use this on a shared or public computer.

4.3The whole menu, in one table

Orders

All Orders
Every order pulled in from your store. Your main working page.

Logistics

Trace
Orders that have shipped, with tracking numbers and delivery status.

Store

Store
The webshop(s) connected to your account and their settings.
Add store
Connect an additional webshop.
API Keys
Read-only keys, if you want to pull your numbers into a spreadsheet or tool.
Store Package
The packaging options we can use, with prices.

Quotation

delete
Removes a store connection. Don't touch it unless we ask you to.
Quotation
Your price list: what each product costs you, per country.
All quotes
Price requests you've sent and our replies.
Product Confirmation
Products waiting for you to approve before we source them.

Payments

New quote
The form for asking a price on a product we haven't quoted yet.
Daily Cost
Your balance and what came off it, day by day.
Order Cost
The same money, broken down per order.

Products

Topup
Add money to your balance.
Stock Inventory
Stock we hold for you, if you've pre-stocked anything.
Products Template
Products you create by hand, for orders that don't come from your store.

Chapter 05

Home — your balance

The home screen answers one question: how do I stand financially?

5.1The home screen

A big balance figure, and under it every day that money came off, newest first.

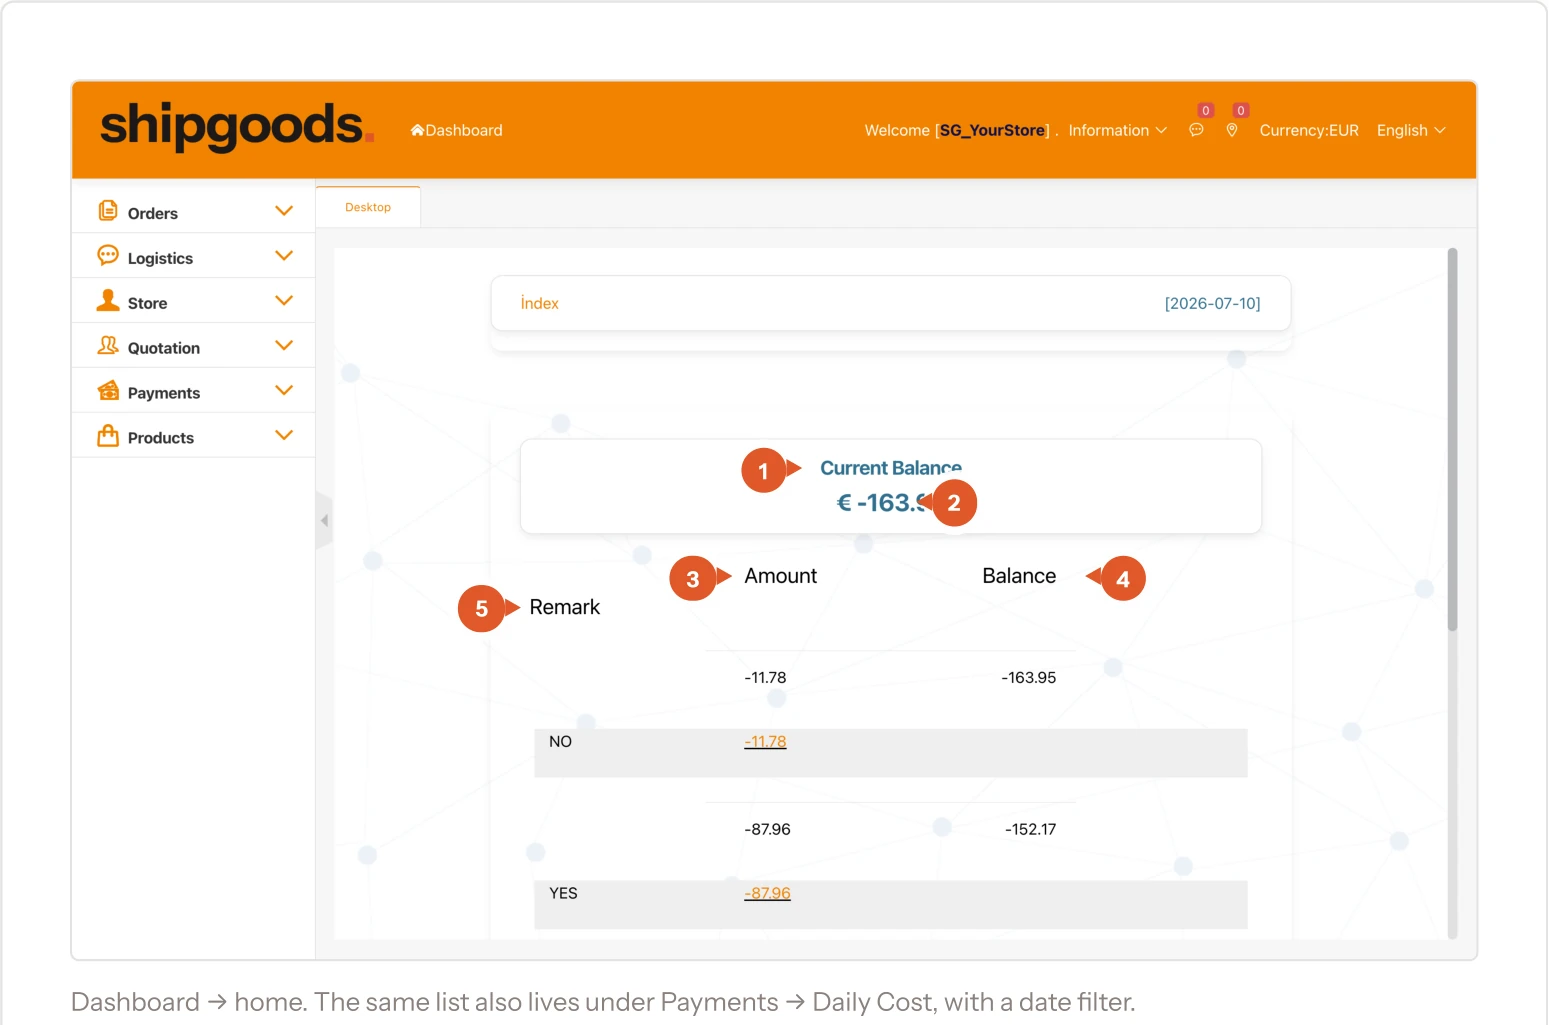
The dashboard home screen showing the current balance and the daily movements underneath
Dashboard → home. The same list also lives under Payments → Daily Cost, with a date filter.
  1. Current Balance. Your running account with Shipgoods, in euros.
  2. The figure itself. A minus means you owe us that amount. Positive means you're paid ahead.
  3. Amount. What came off (or went on) that day.
  4. Balance. What your balance stood at after that day's movement.
  5. Remark. Which store the charge belongs to, plus an internal note from our side.

5.2Reading a day's line

Each dated block is one day. The amount is that day's total; underneath it you see the individual charges that made it up, and clicking an orange amount opens the detail. If a day looks bigger than expected, the fastest way to see why is Payments → Order Cost (9.2), which lists the same money order by order.

5.3The one number that matters

Chapter 06

Orders

Every order that came in from your webshop, with its status on our side.

6.1All Orders — the page you'll live in

If you only ever open one page in this dashboard, it's this one.

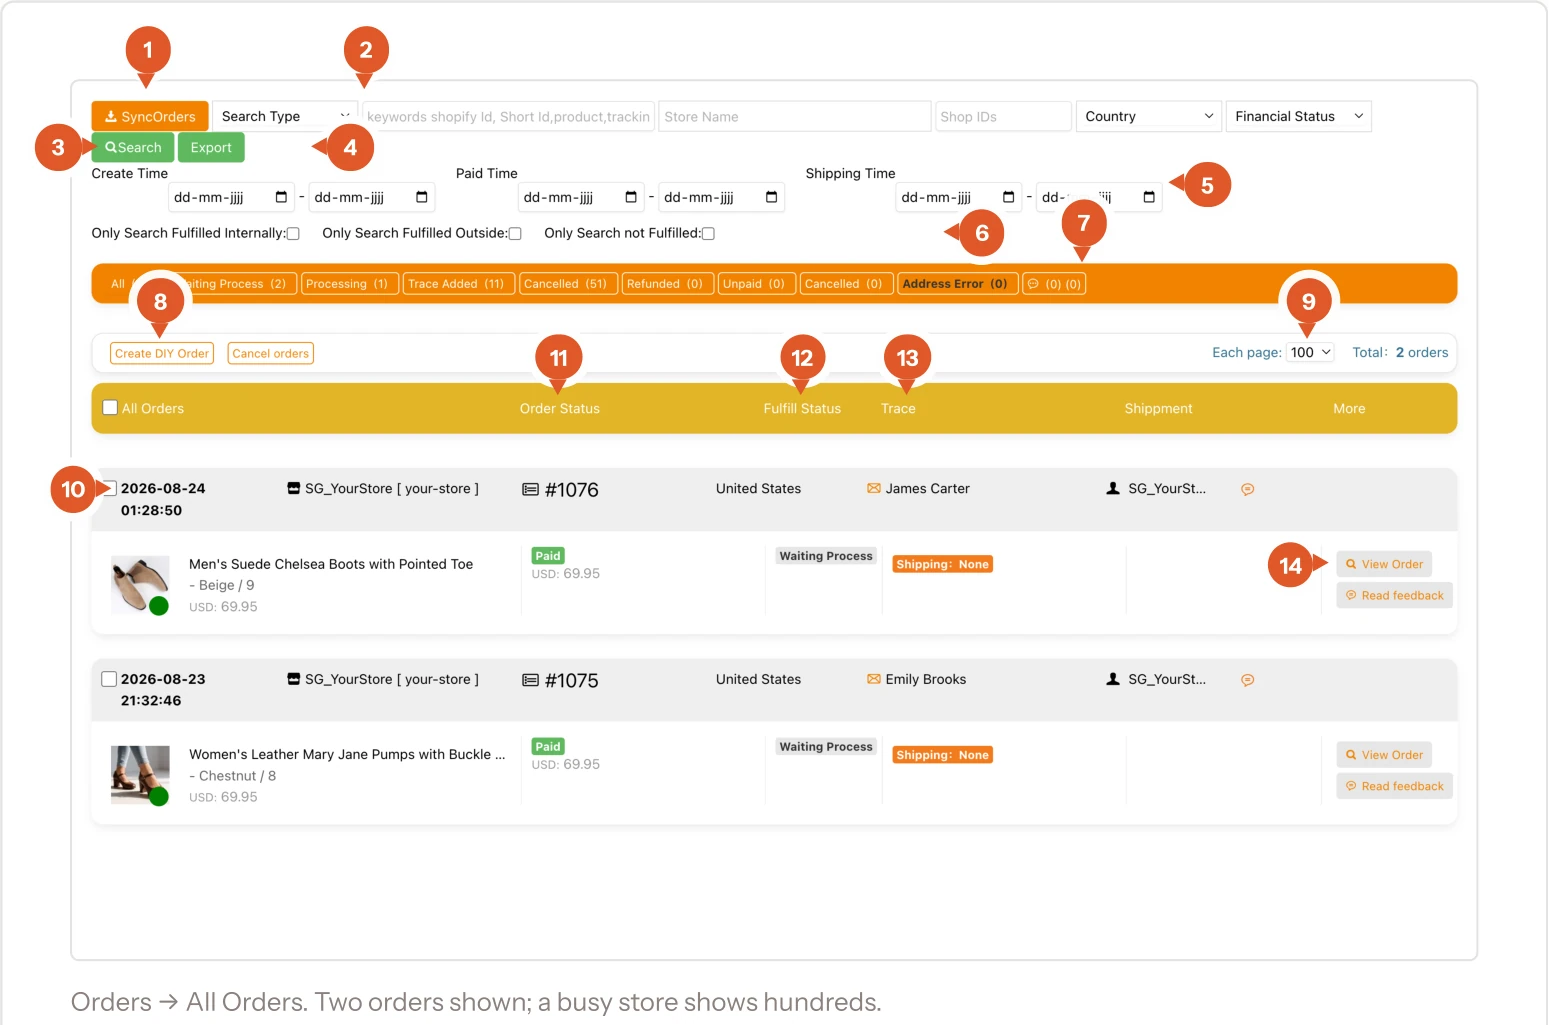
The All Orders page with search filters, the status chip bar and two order lines
Orders → All Orders. Two orders shown; a busy store shows hundreds.
  1. SyncOrders. Pulls the newest orders from your store right now. Orders arrive on their own too — use this when you've just placed a test order and want to see it immediately.
  2. Search row. Pick what you're searching by (order number, product, tracking number, customer name, Shopify ID), then type it in the box next to it.
  3. Search. Runs the filters above.
  4. Export. Downloads the filtered list as a spreadsheet.
  5. Date filters. Three separate ranges: when the order was created, when it was paid, and when it shipped.
  6. Fulfilment checkboxes. Narrow to orders fulfilled by us, fulfilled elsewhere, or not fulfilled at all.
  7. Status bar. The heart of the page — each chip filters the list and shows how many orders are in that state. See 6.2.
  8. Create DIY Order. Make an order by hand, for something that didn't come through your webshop.
  9. Rows per page and total. Set it to 100 or more if you're scanning a busy day.
  10. The order line. Date and time, which store it came from, your webshop's order number, destination country, and the customer's name.
  11. Order Status. Whether the customer paid you — Paid is what you want to see.
  12. Fulfill Status. Where we are with it. Waiting Process means received but not yet picked up.
  13. Trace. Shipping: None means no tracking number yet. Once it ships, the tracking number appears here.
  14. View Order / Read feedback. Open the full order, or read the message thread on it.

6.2What each status chip means

All
Everything, no filter.
Waiting Process
The order has arrived and is queued. Nothing for you to do.
Processing
We're sourcing and packing it.
Trace Added
Shipped — a tracking number is attached and sent back to your store.
Cancelled
Cancelled, either by you in your webshop or by us. It won't be shipped or charged.
Refunded
The customer was refunded in your webshop.
Unpaid
The order exists but isn't paid in your webshop. We don't ship these.
Address Error
Needs you. The delivery address was rejected — missing house number, unknown postcode, wrong country. Fix it in your webshop, or contact the customer.

6.3Inside a single order

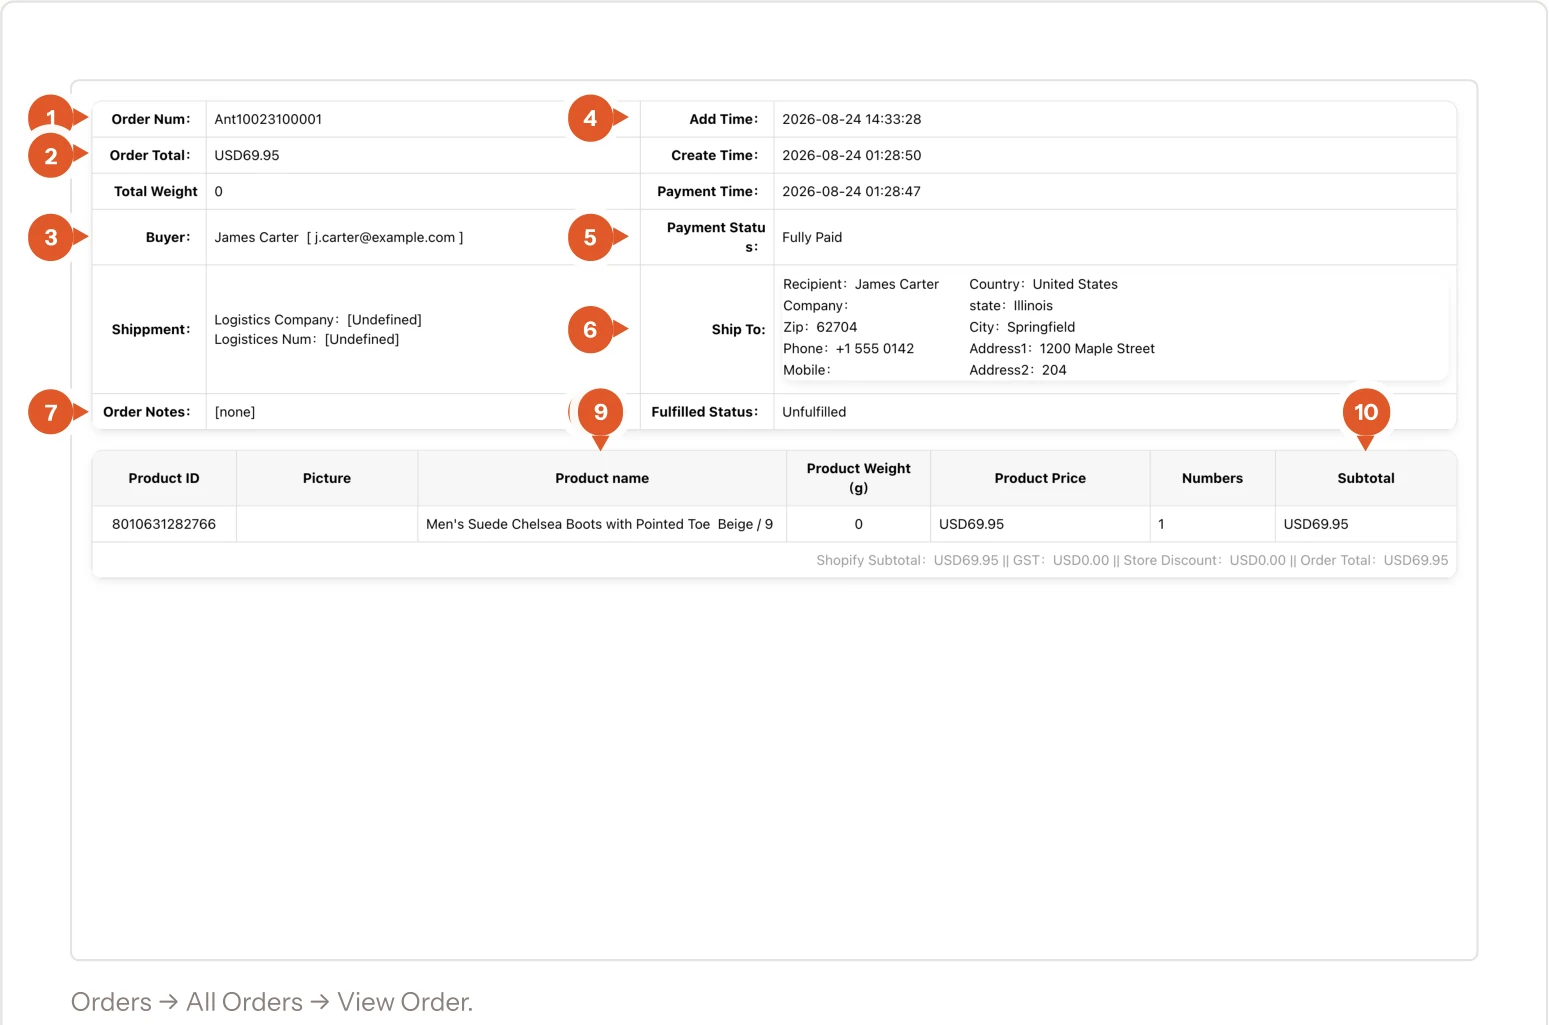
Click View Order on any line and you get the whole picture: money at the top left, timing at the top right, the delivery address in the middle, and the products at the bottom.

A single order detail view with order number, totals, buyer, shipping address and product lines
Orders → All Orders → View Order.
  1. Order Num. Our reference for this order. Quote it when you message us about it.
  2. Order Total. What your customer paid you — not what you pay us.
  3. Buyer. Your customer's name and email as they entered it at checkout.
  4. Times. When the order arrived here, when it was created in your store, and when it was paid.
  5. Payment Status. Fully Paid is the green light for us to ship.
  6. Ship To. The delivery address exactly as we'll use it. If an order is stuck on Address Error, this is where you check what's wrong.
  7. Order Notes. Notes carried over from your webshop, if any.
  8. Fulfilled Status. Whether it has shipped from our side.
  9. The product lines. Which product and variant, at what quantity.
  10. Subtotal line. How the order total breaks down, including any discount.

6.4“My order isn't here”

Three usual reasons: it isn't paid yet in your webshop, it was placed before your store was connected, or the sync hasn't run. Press SyncOrders first; if it still doesn't appear, message us with the webshop order number.

Chapter 07

Trace — where are my parcels?

Once an order ships it appears here with its tracking number and delivery state.

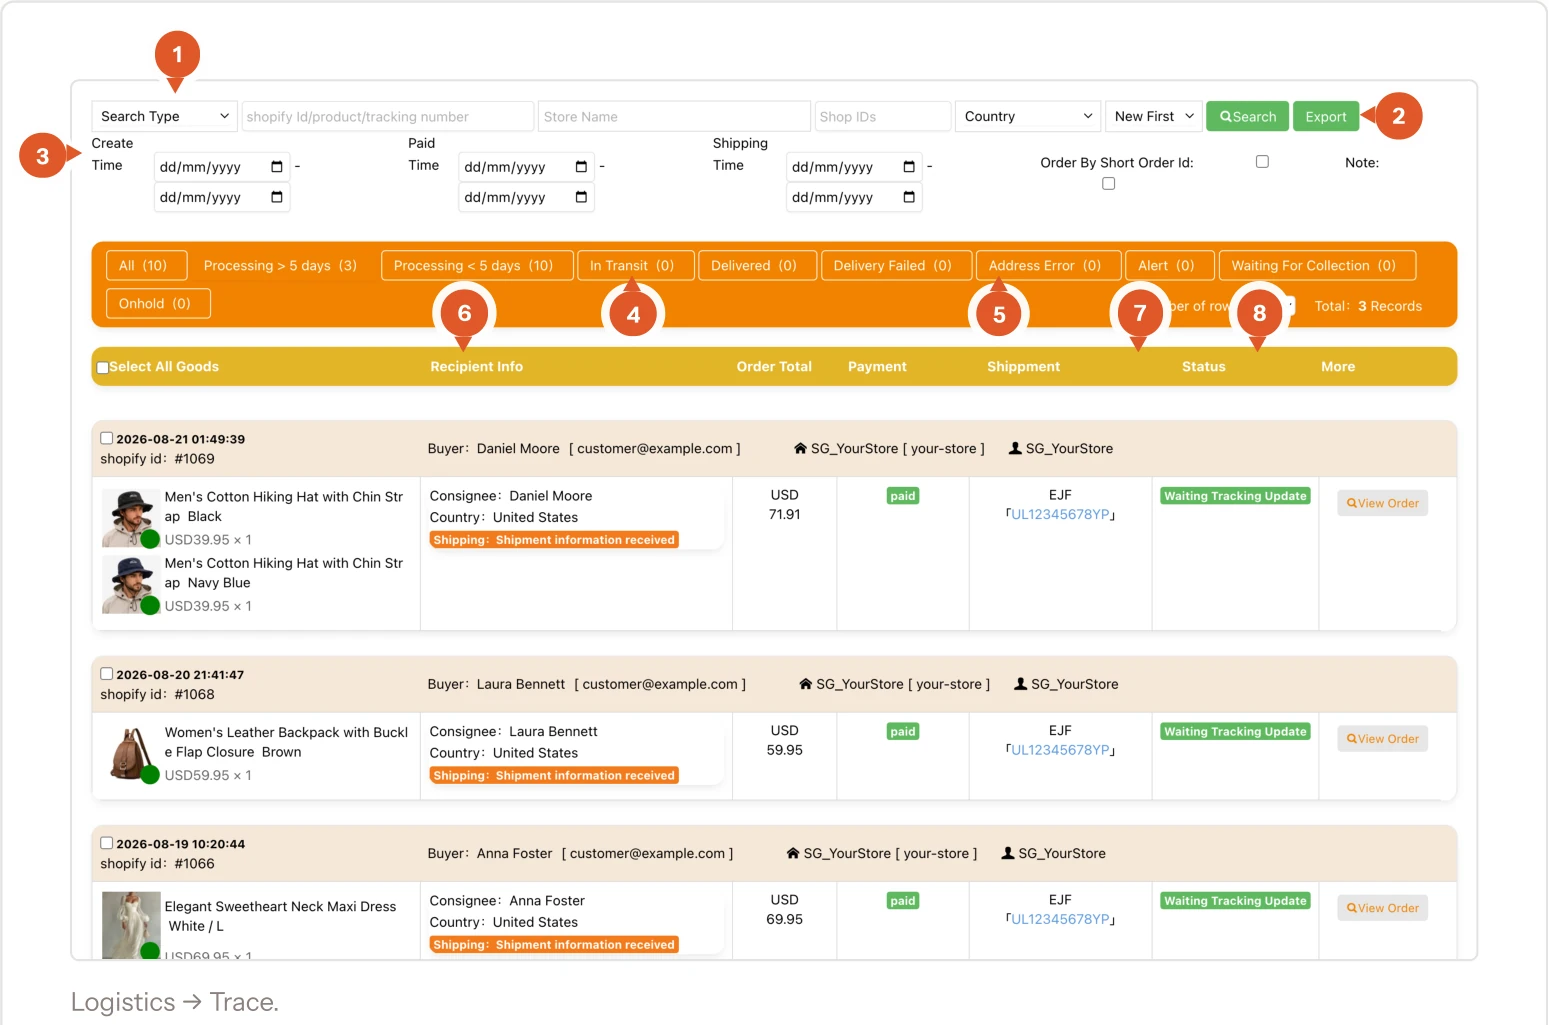
7.1The Trace page

This is the page to open when a customer emails asking where their order is.

The Trace page with filter chips and three shipped orders with tracking numbers
Logistics → Trace.
  1. Search. Look a parcel up by tracking number, order number or product.
  2. Export. The filtered list as a spreadsheet — handy for a bulk update to customers.
  3. Date ranges. Created, paid and shipped, same as on the orders page.
  4. In Transit / Delivered. The two states you'll see most.
  5. Address Error and Alert. Parcels the carrier couldn't handle. These need action — usually a corrected address.
  6. Recipient Info. Buyer, consignee and destination country in one block.
  7. Shipment. The carrier and the tracking number. The number is a link — click it to open the carrier's tracking page.
  8. Status. The carrier's latest state for this parcel.

7.2The filter chips

Processing > 5 days
Still with us after five days. Worth asking about.
Processing < 5 days
Being prepared, within normal time.
In Transit
Handed to the carrier and moving.
Delivered
Carrier reports it as delivered.
Delivery Failed
A delivery attempt failed. Usually address or recipient not available.
Waiting For Collection
At a pickup point, waiting for the customer.
Onhold
Paused — customs, a stock issue, or a query from our side.

7.3Answering “where is my order?”

Search the customer's order number here, copy the tracking number, and send it. If the status is Delivery Failed or the parcel hasn't moved for days, message us with the order number rather than waiting.

Chapter 08

Prices and quotes

A product needs a confirmed price before we can fulfil it. This is where that happens.

8.1Quotation — your agreed prices

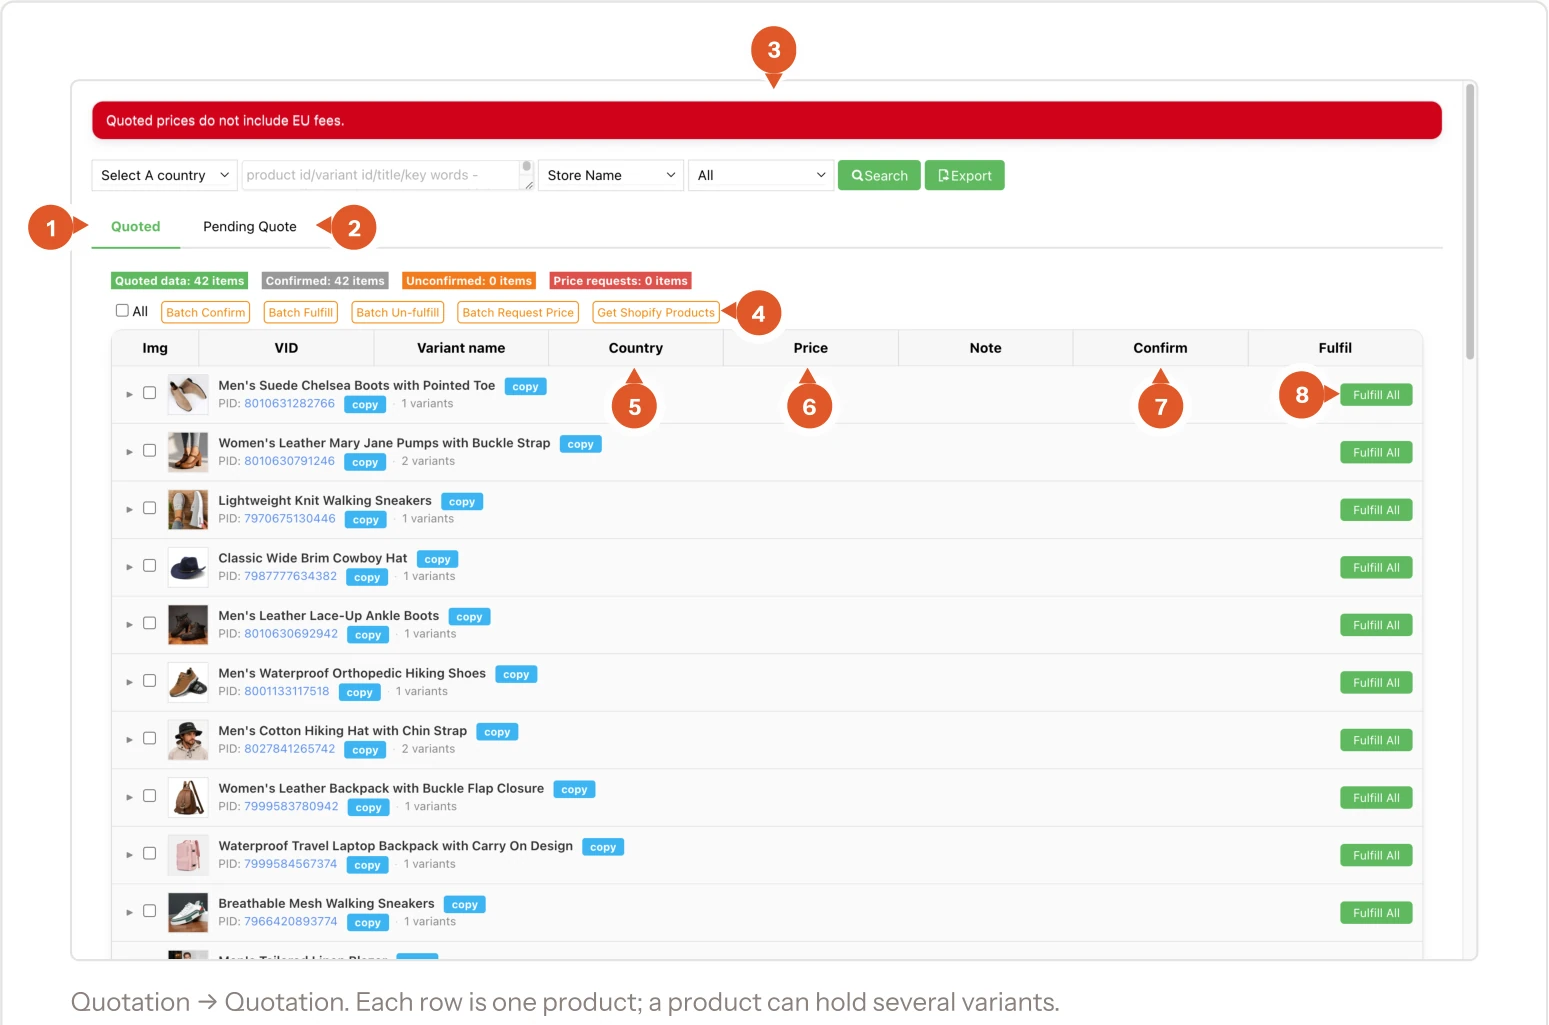
Your price list. Every product we've quoted for you, what it costs per country, and whether you've confirmed it.

The Quotation page listing quoted products with country, price, confirm and fulfil columns
Quotation → Quotation. Each row is one product; a product can hold several variants.
  1. Quoted. Products that already have a price. Your working list.
  2. Pending Quote. Products still waiting for a price from us.
  3. The red banner. Quoted prices exclude EU fees — read it once so the invoice holds no surprises.
  4. The batch buttons. Batch Confirm accepts several prices at once; Batch Request Price asks for a price on products already in an order; Get Shopify Products pulls your catalogue over from Shopify.
  5. Country. Prices differ per destination, so the same product can appear more than once.
  6. Price. What this product costs you per unit, excluding EU fees.
  7. Confirm. Your acceptance of the quoted price.
  8. Fulfil All. Marks this product as one we should fulfil for you.

Products have variants — sizes, colours. Click the small triangle at the start of a row to fold the variants open and see the price for each one. The row count (1 variants, 2 variants) tells you how many are hiding there.

8.2The order to do things in

8.3Asking for a new price

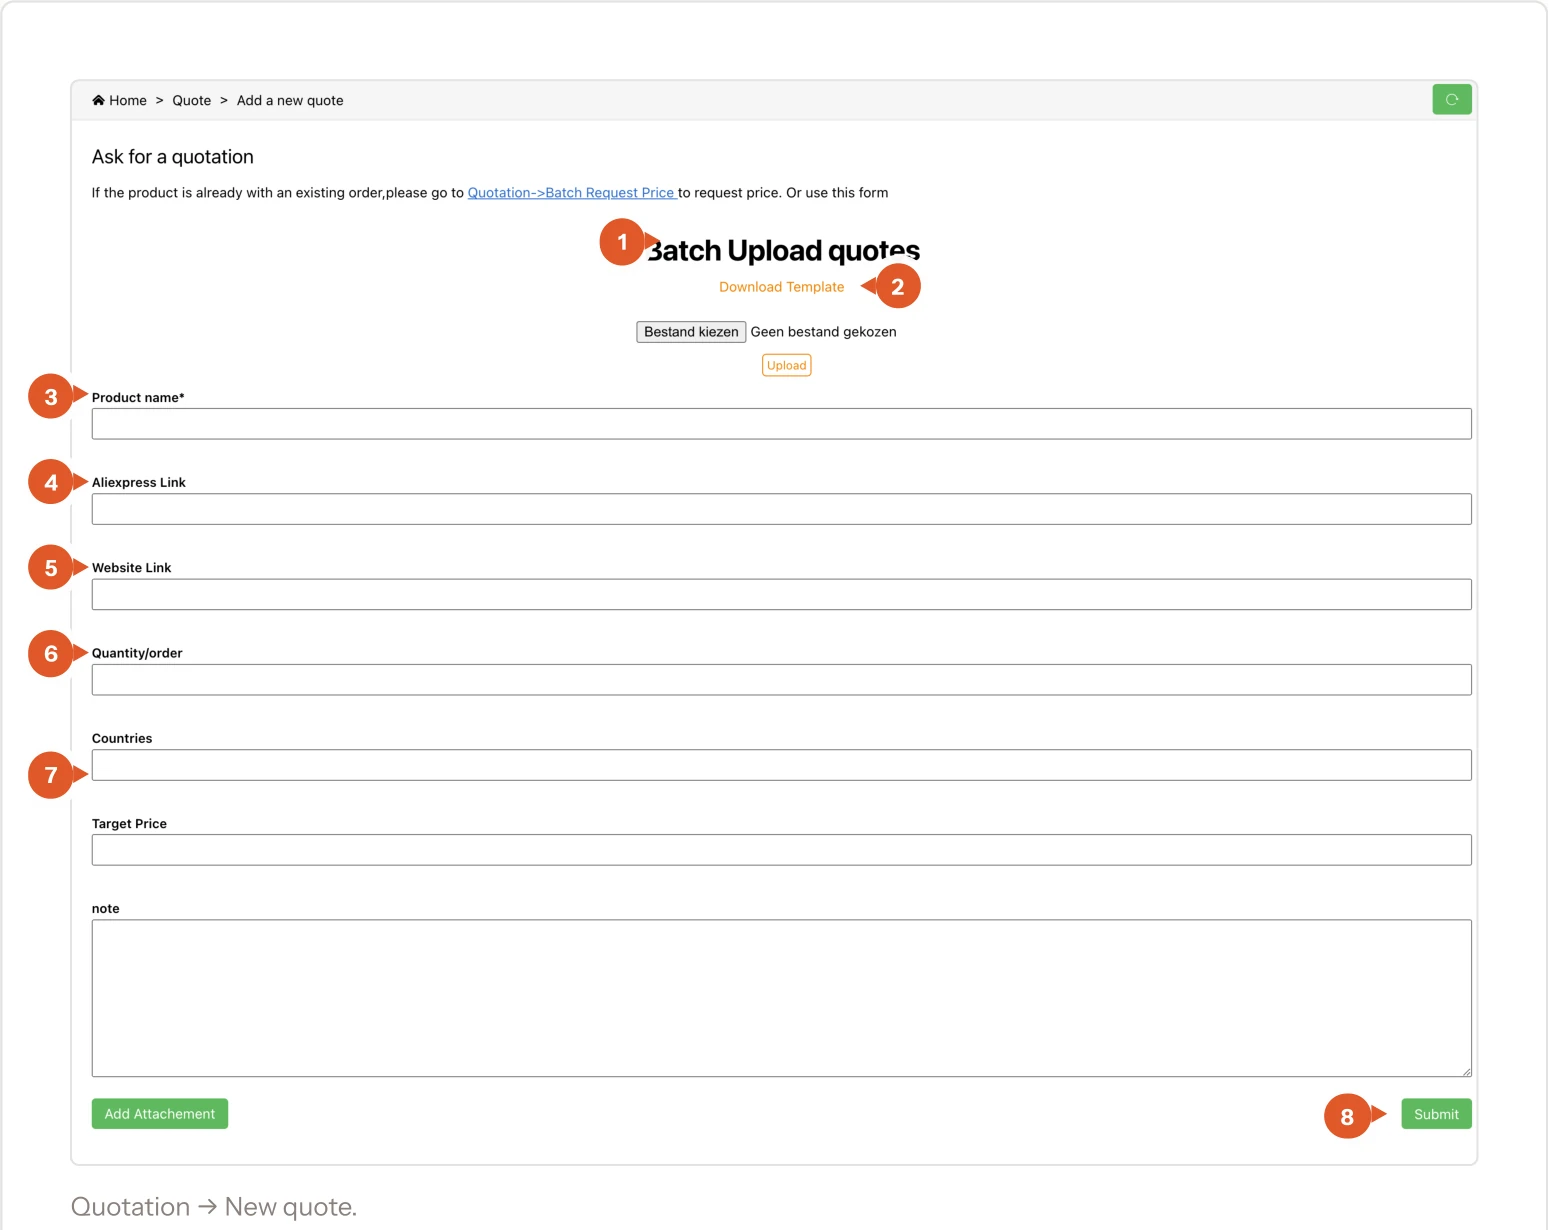
For a product we haven't seen before. Fill in as much as you can — the more we get, the faster and more accurate the quote comes back.

The new quotation form with product name, AliExpress link, website link, quantity, countries and target price
Quotation → New quote.
  1. Batch Upload quotes. Ten products at once? Download the template, fill it in, upload it.
  2. Download Template. The spreadsheet with the right columns already in it.
  3. Product name. The only required field. Be specific — “black leather Chelsea boot, men's” beats “boot”.
  4. AliExpress link. The single most useful thing you can give us. It pins down exactly which product you mean.
  5. Website Link. Your own product page, so we can see the photos and variants you're selling.
  6. Quantity / order. How many units a typical order contains.
  7. Country and target price. Where it ships to, and what you'd need the cost to be to make the margin work.
  8. Submit. The request lands with our sourcing team; the reply appears under All quotes.

8.4All quotes

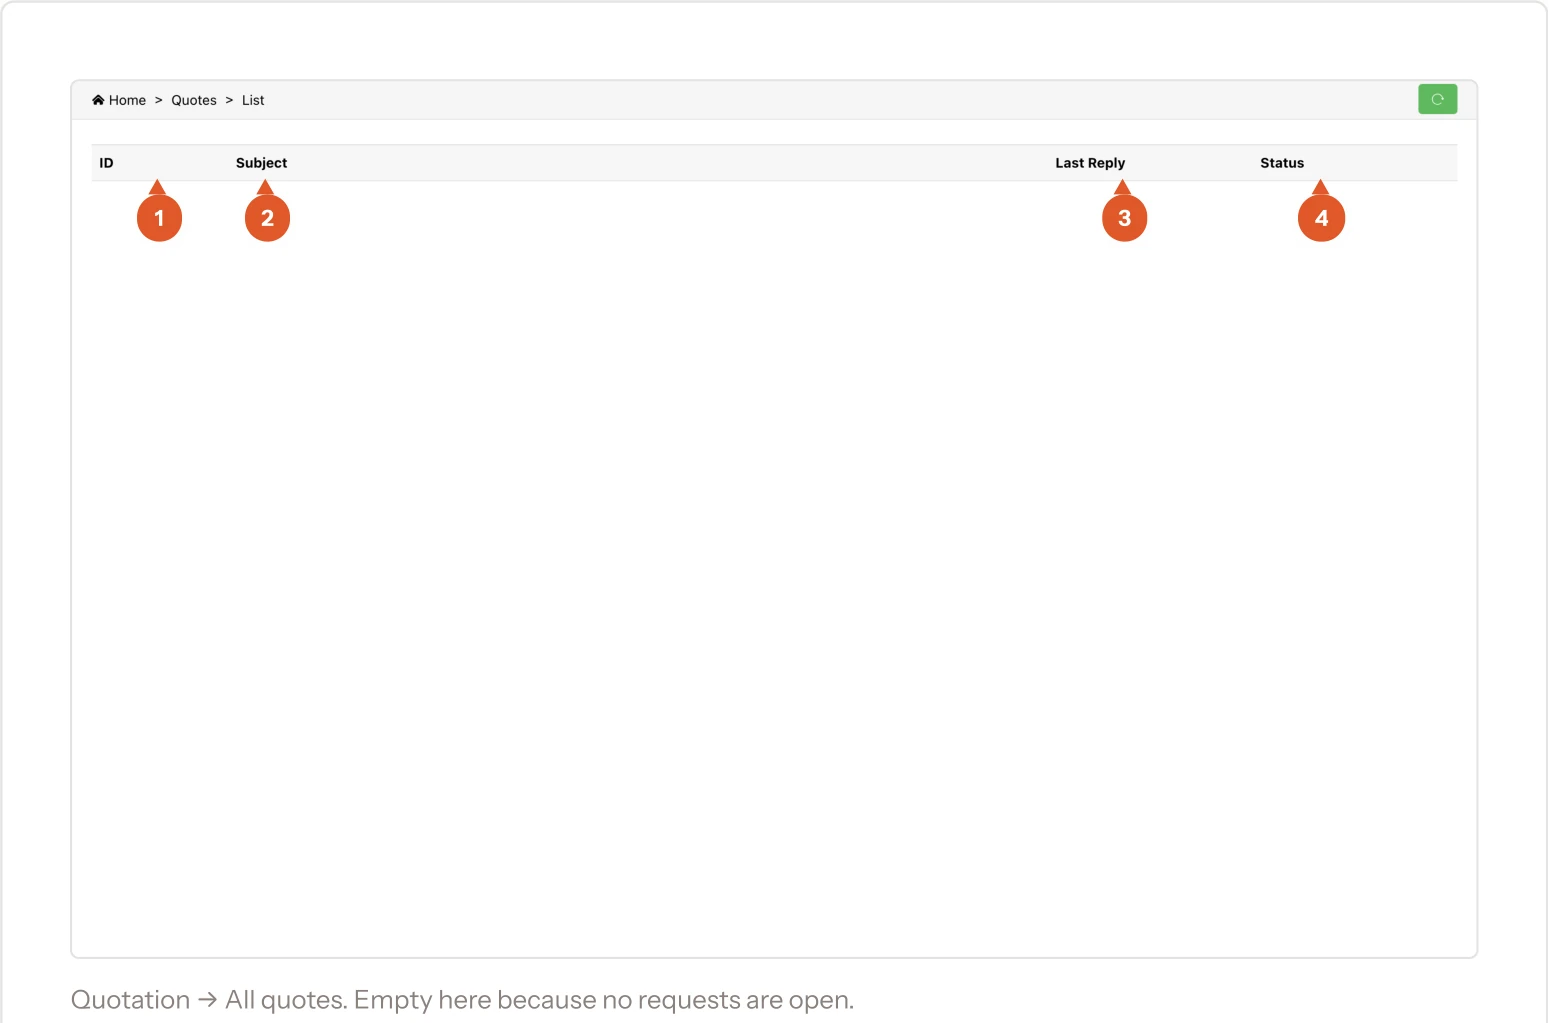
The conversation: every price request you've sent and our replies.

The All quotes list with ID, subject, last reply and status columns
Quotation → All quotes. Empty here because no requests are open.
  1. ID. The reference of your price request.
  2. Subject. What you asked about.
  3. Last replied. When either side last said something. A stale date means it's waiting on someone.
  4. Status. Open, answered or closed. Click a row to read the thread and reply.

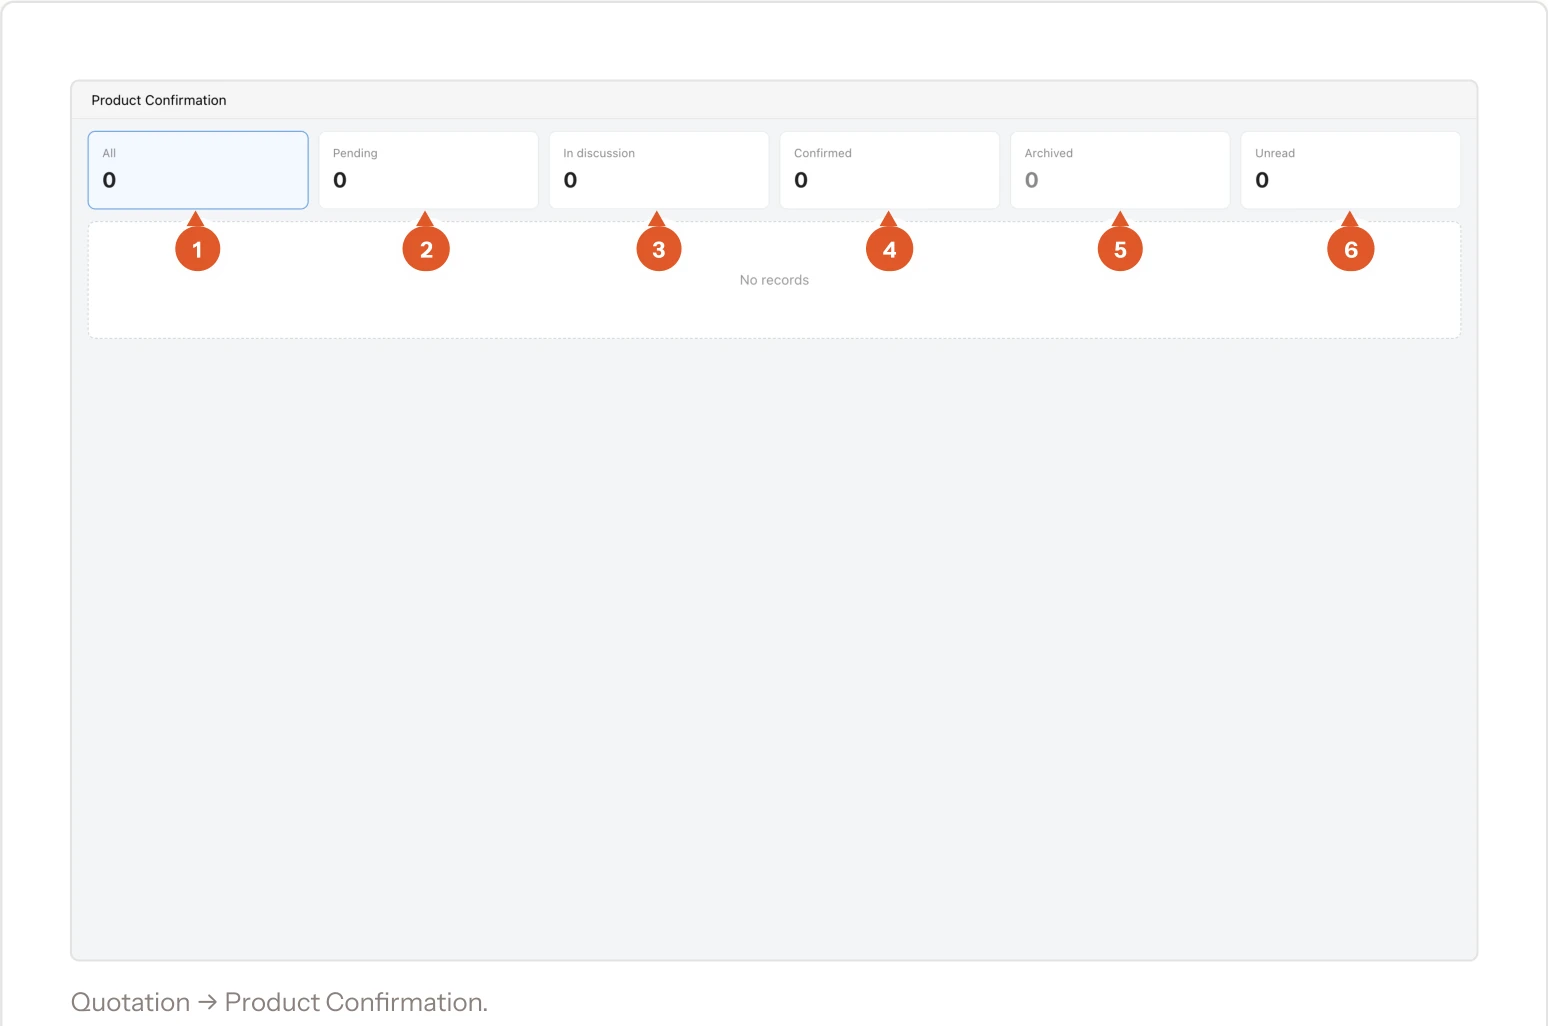
8.5Product Confirmation

When a product needs your go-ahead before we buy it — a size that runs different, another shade, a similar style — it lands here. This used to reach you as a message; it is now a thread inside the dashboard, with the photo, the variants and the orders waiting on that product all in one place.

A banner across the top of the dashboard tells you when something is waiting: “You have 47 unread product confirmation message(s)”. Click it and you land straight on this page.

The Product Confirmation page with All, Pending, In discussion, Confirmed, Archived and Unread counters
Quotation → Product Confirmation. The six counters across the top.
  1. All. Everything we've put in front of you.
  2. Pending. Waiting on you. We do not buy the product until you answer.
  3. In discussion. A conversation is running — a photo, a variant, a substitute.
  4. Confirmed. Approved and clear to source.
  5. Archived. Closed off, kept for reference.
  6. Unread. Items you haven't opened yet.

Answering one, start to finish:

Open the Pending listQuotation → Product Confirmation, then click the Pending card. That is the queue that is actually waiting on you.
Click an itemThe thread opens with our question at the top — for example “L size is different, the size is 39x11x18cm, please confirm” — and the variants underneath, each with its photo, the destination country and the price per unit.
Decide what you are answering forEntire product covers every variant in the thread. Tick Selected variants instead when only some of them are fine, then tick the ones you mean.
Confirm, or objectConfirm and we source and ship it. Not right? Object with reason and say what is wrong in the chat box — we answer in the same thread, so the whole exchange stays with the product.

Related orders. Every thread lists the orders that are waiting on this product, with their waybill numbers. Copy # puts those order numbers on your clipboard in one click — ready to paste into a reply to your customer. Export gives you the same list as a spreadsheet.

Chapter 09

Payments and balance

What you were charged, per day and per order, and how to put money in.

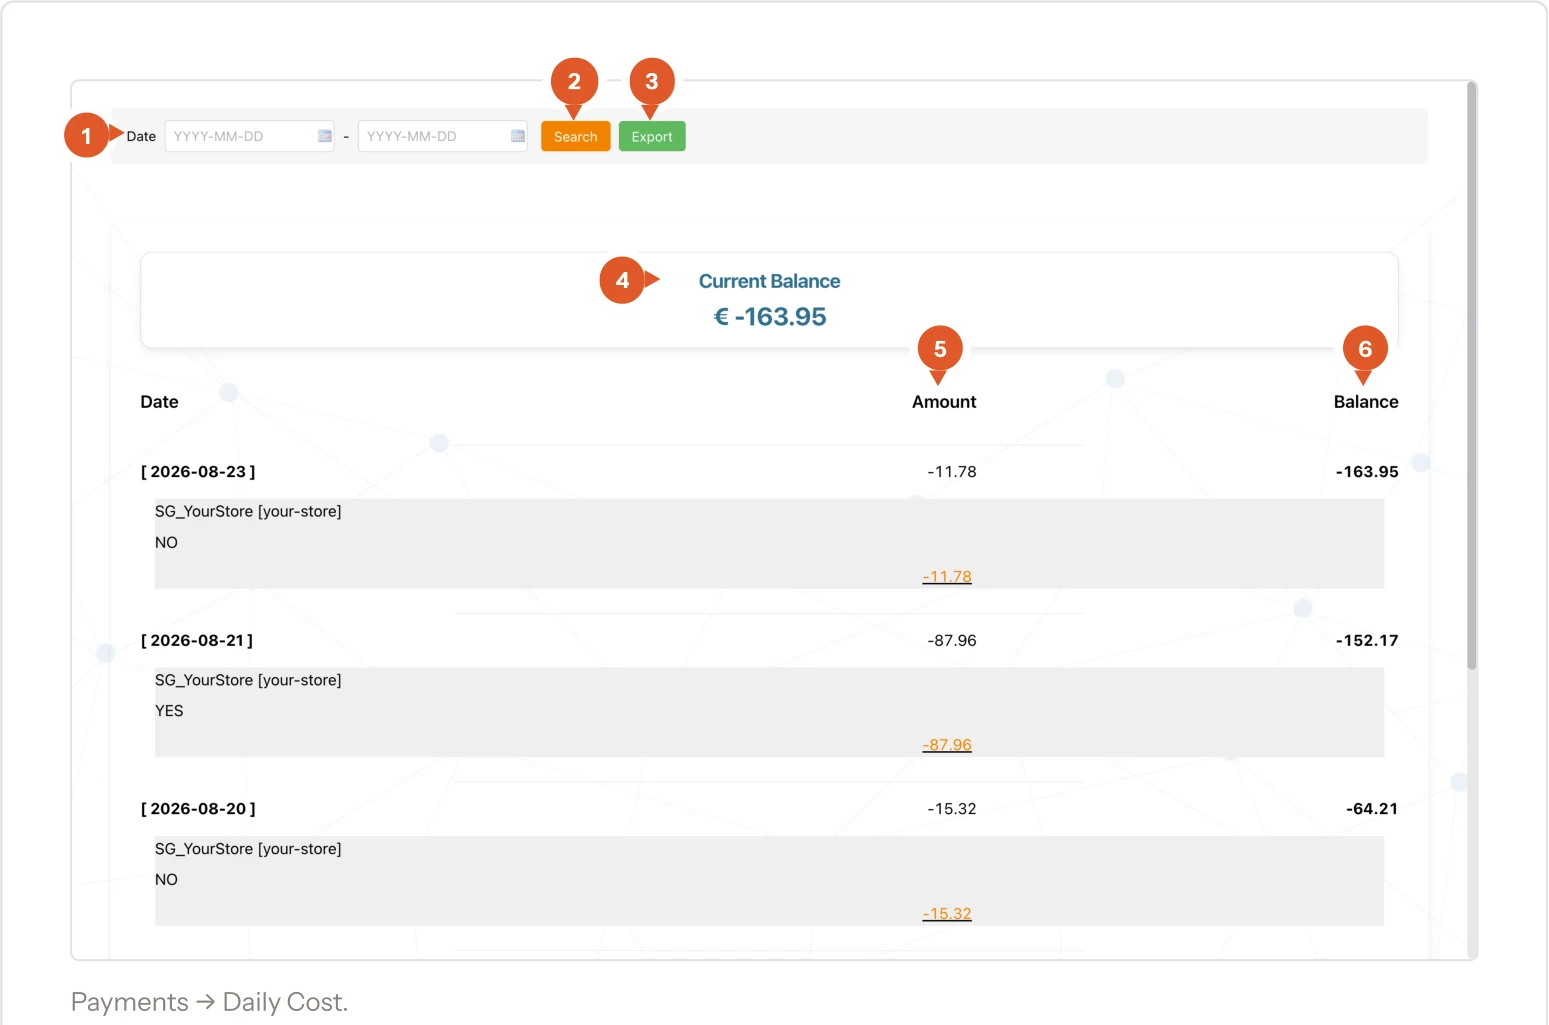
9.1Daily Cost — what you were charged

The home screen's balance list, plus a date filter and an export. This is the page for “what did we spend last month?”

The Daily Cost page with a date range, current balance and per-day amounts
Payments → Daily Cost.
  1. Date range. From and to. Leave it empty to see everything.
  2. Search. Applies the date range.
  3. Export. The selected period as a spreadsheet — this is what your bookkeeper wants.
  4. Current Balance. Today's standing, regardless of the filter.
  5. Amount. The movement on that day.
  6. Balance. Your balance after that day.

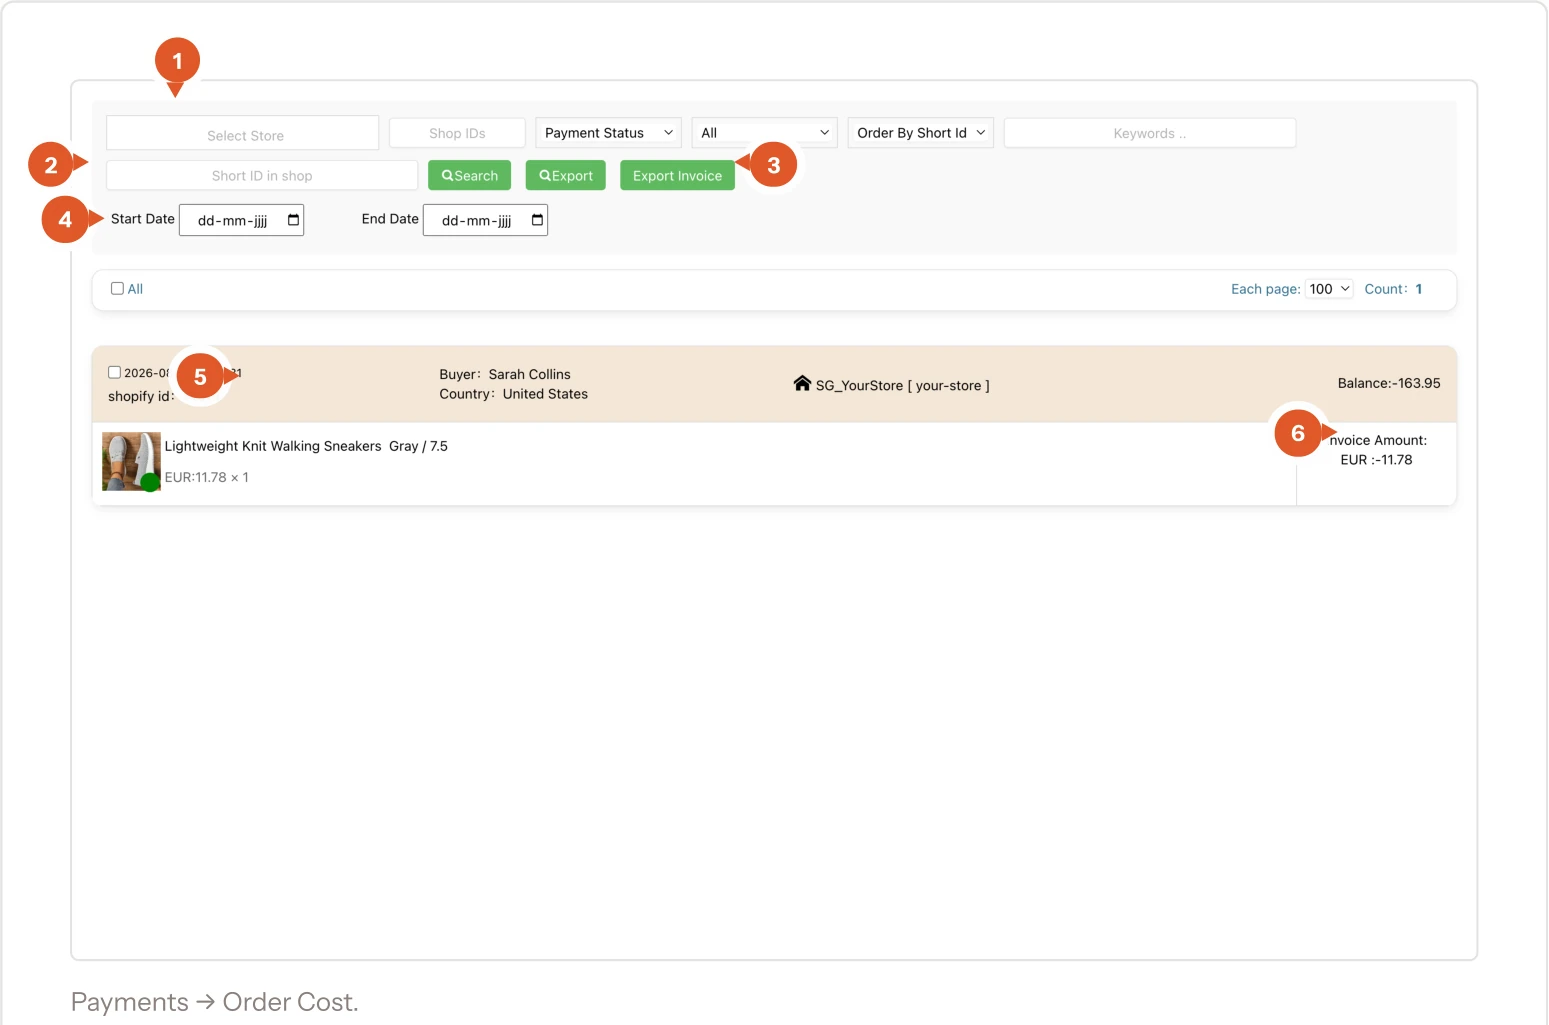
9.2Order Cost — cost per order

The same money as Daily Cost, split per order. Use it to check a specific order, or to work out your real margin on a product.

The Order Cost page with store filters, date range and one order showing its invoice amount
Payments → Order Cost.
  1. Filters. Narrow to one store, to a payment status, or sort by order ID.
  2. Search fields. Look an order up by its number or a keyword.
  3. Export Invoice. Produces an invoice document for the selected orders — the one for your accounts.
  4. Start and end date. The period you're looking at.
  5. The order line. Customer, destination, which store it came from, and your balance at that moment.
  6. Paid amount. What this order actually cost you. Compare it with what your customer paid to see the margin.

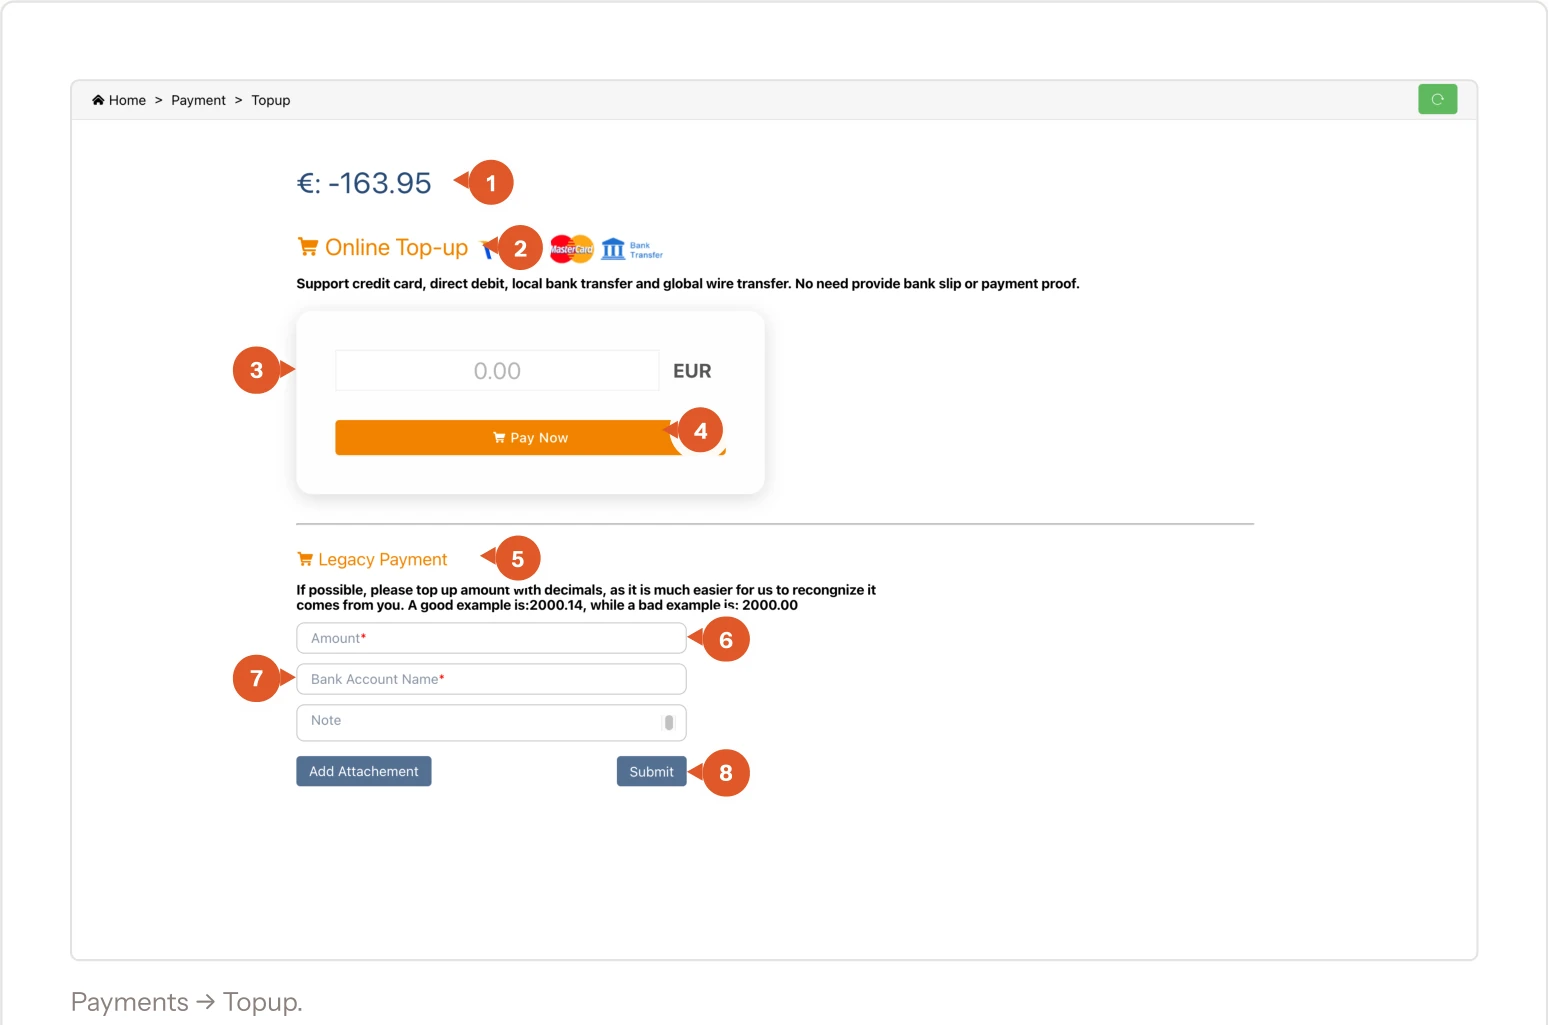
9.3Top-up — putting money in

Two ways to add funds. The online route is instant and needs nothing from you afterwards; the bank transfer route is manual and needs a little care.

The Topup page with the online top-up amount field and the legacy bank transfer form
Payments → Topup.
  1. Your balance. Repeated here so you know how much to add.
  2. Online Top-up. Card, direct debit, local bank transfer and international wire. No proof of payment needed — it lands by itself.
  3. Amount. What you want to add, in euros.
  4. Pay Now. Opens the payment screen. This is the route we recommend.
  5. Legacy Payment. For a transfer you've already made from your own bank.
  6. Amount with decimals. Send an odd amount like 2000.14 rather than a round 2000.00. It makes your transfer identifiable among many.
  7. Account holder name. The name on the bank account you sent it from.
  8. Add attachment / Submit. Attach the transfer receipt and send it in so we can match the money.

9.4How much, how often

Take your average daily cost from Daily Cost and top up a week or two ahead of it. It costs nothing to sit in credit, and it takes the balance off your daily worry list entirely.

Chapter 10

Store settings

How your webshop is wired to us, packaging, and keys for your own tools.

10.1Your store connection

Normally Shipgoods sets this up once and you never come back — but it's worth knowing what's here.

The Store page with a connected Shopify store unfolded, showing name, domain, API key and supply type
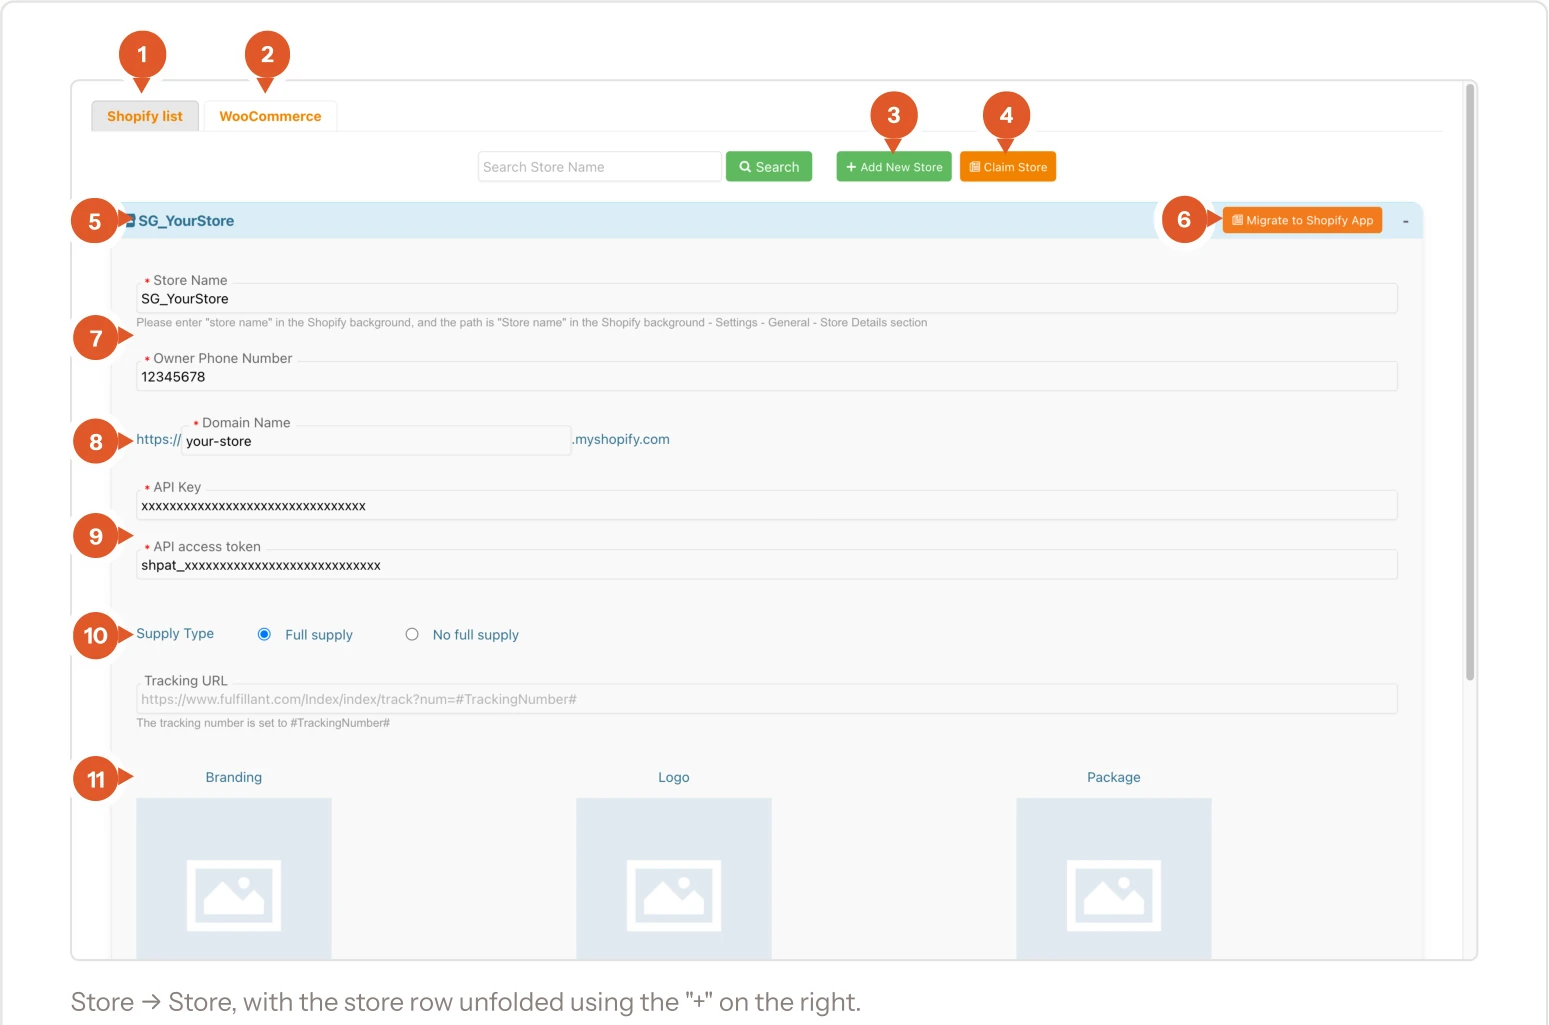
Store → Store, with the store row unfolded using the “+” on the right.
  1. Shopify list. Your Shopify stores.
  2. WooCommerce. The same, for WooCommerce shops.
  3. Add New Store. Connect another webshop — 10.2.
  4. Claim Store. Take over a store that's already in the system under someone else. Only with our help.
  5. The store row. One row per connected shop. The + at the far right folds it open.
  6. Migrate to Shopify App. Switches the connection to our Shopify app instead of manual keys. Don't press this on a live store without asking us.
  7. Store Name and phone. The name must match the store name in your Shopify settings, or orders won't match up.
  8. Domain Name. Your .myshopify.com address — the internal one, not your public domain.
  9. API Key and access token. The credentials that let us read your orders. Treat them like a password.
  10. Supply Type. Full supply means we handle everything for this store.
  11. Branding, Logo, Package. Upload artwork here if you want branded inserts or packaging in your parcels.

10.2Adding another store

Running a second webshop? Connect it here and its orders flow into the same account and the same balance.

The Add store form with store name, domain, API key, access token and supply type
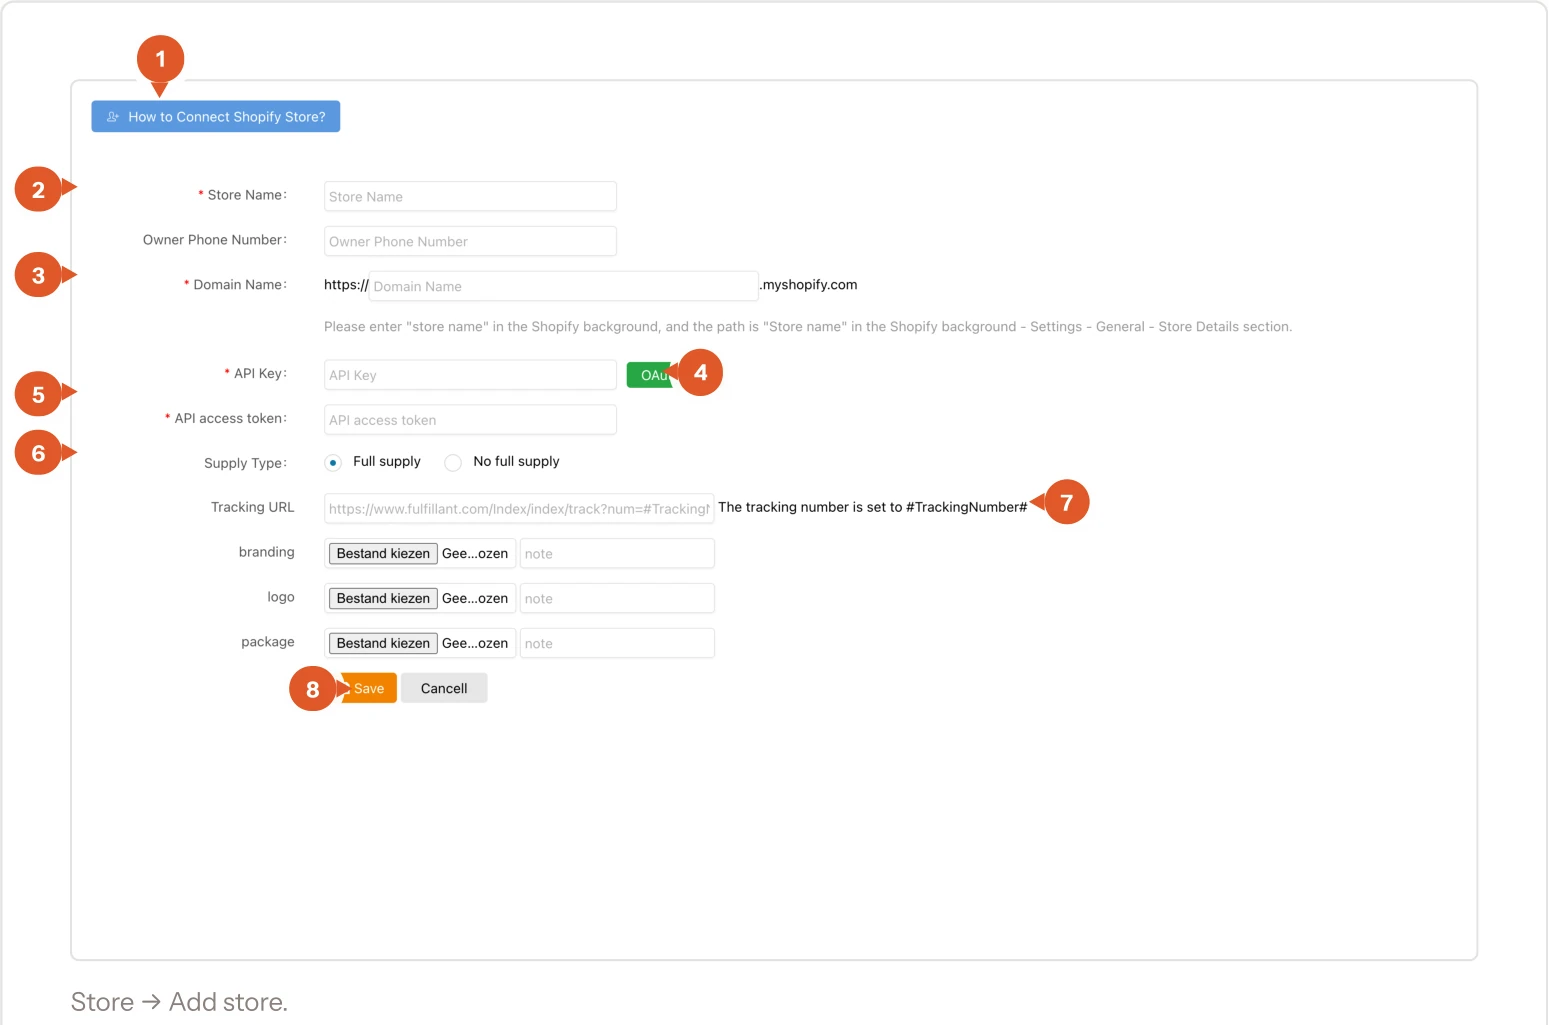
Store → Add store.
  1. How to Connect Shopify Store?. A short walkthrough. Read it before you start — or use chapter 2 of this documentation.
  2. Store name and phone. Copy the name exactly from Shopify: Settings → General → Store details.
  3. Domain. The part before .myshopify.com, not your public domain name.
  4. OAuth. Authorise through Shopify rather than pasting keys — the easier route if it's offered to you.
  5. API key and access token. From the custom app you create in Shopify. Chapter 2 shows where they are.
  6. Supply type. Leave on Full supply unless we've told you otherwise.
  7. Tracking URL. Optional. Fill it in if you want tracking links to point at your own tracking page.
  8. Save. Once saved, orders start flowing in. Check All Orders a few minutes later to confirm.

10.3Store Package — how your parcel is packed

A catalogue of the packaging we can use, each with its price. Boxes, zipper bags, phone-case boxes, jewellery cases, earring tags. If you want your orders packed in something specific — or branded — pick it here and tell us.

The Store Package catalogue showing packaging options with names, prices and ids
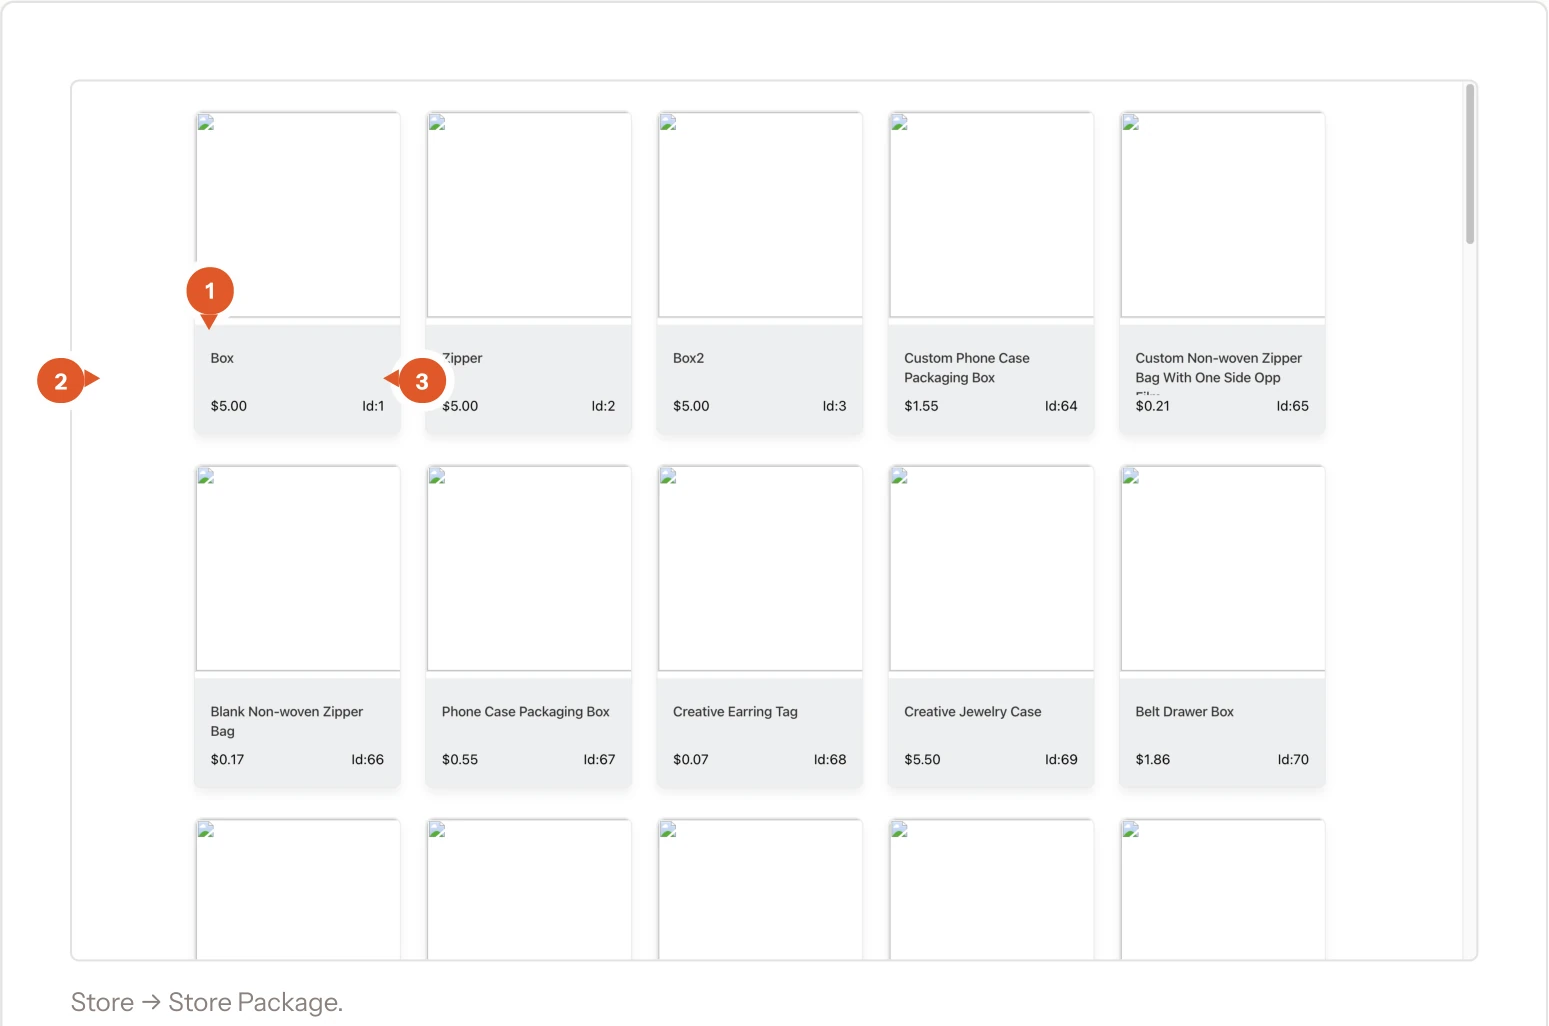
Store → Store Package.
  1. The packaging name. What it is.
  2. Price. Added per order that uses it.
  3. Id. The reference to quote when you tell us which one you want.

10.4API Keys — for spreadsheets and tools

Optional and technical. If you want your order and payment numbers in a spreadsheet, a BI tool or your own script, create a read-only key here. Skip this section entirely if that means nothing to you.

The API Keys page with the endpoint list, a create-key form and the existing keys table
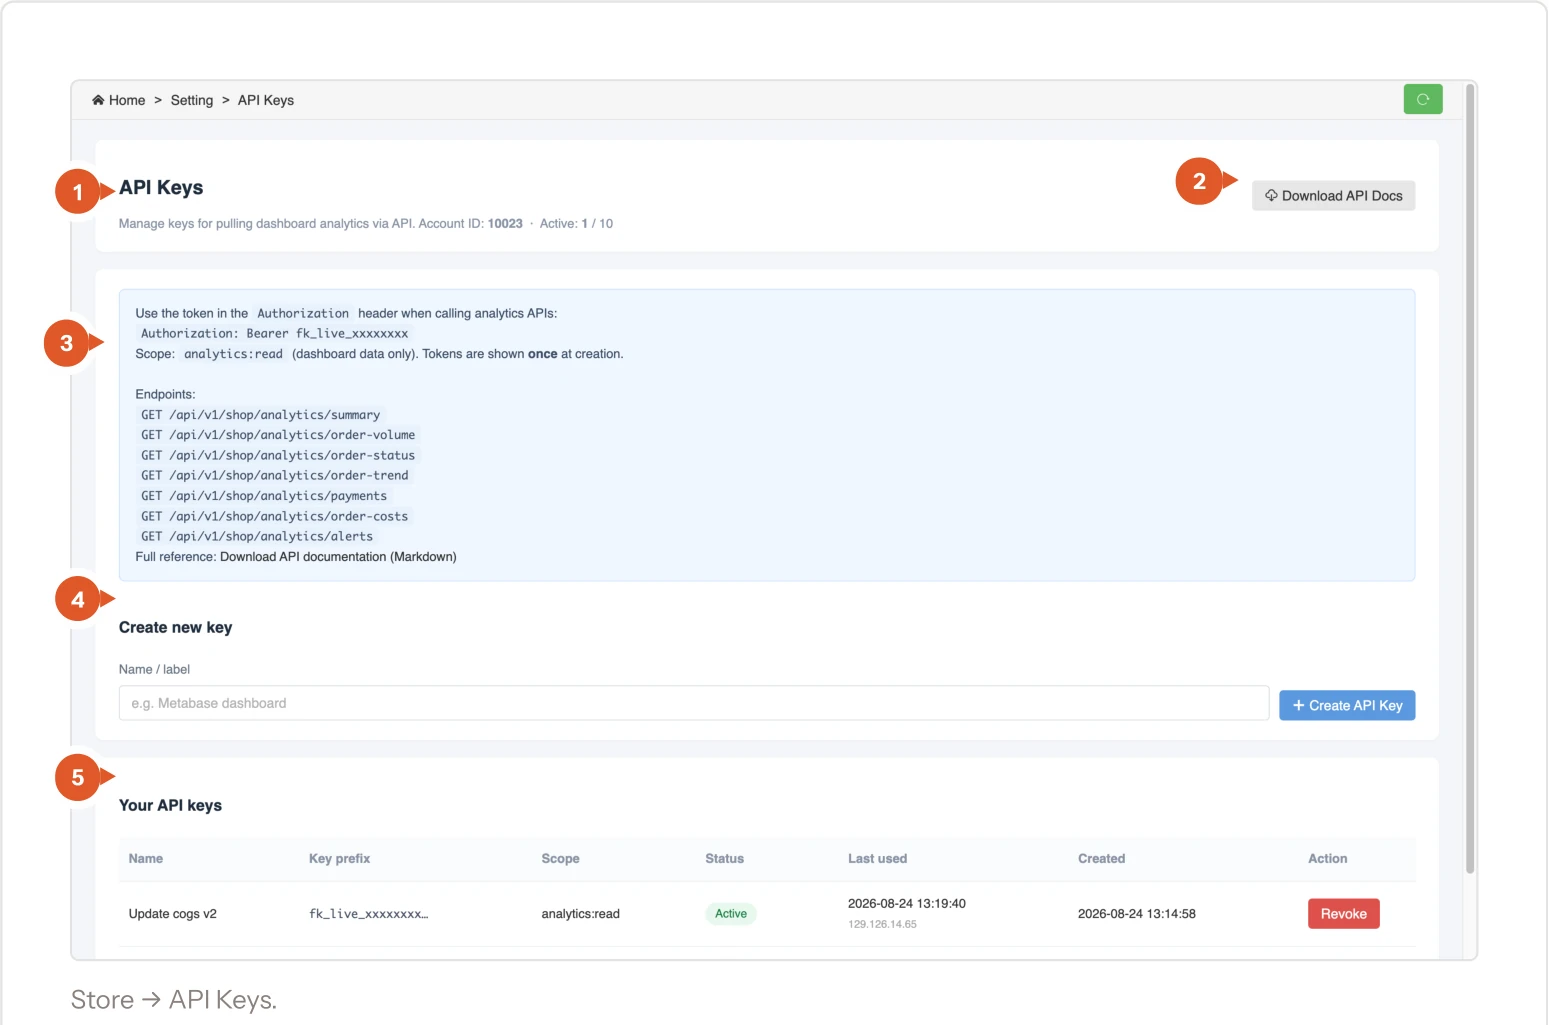
Store → API Keys.
  1. Your account ID. And how many keys you have of the ten allowed.
  2. Download API Docs. The full technical reference.
  3. The endpoints. Read-only: summary, order volume, order status, order trend, payments, order costs, alerts.
  4. Create new key. Give it a name you'll recognise later, then press Create API Key.
  5. Your API keys. Name, prefix, scope, status and when it was last used. Revoke kills a key immediately — use it the moment one might have leaked.

Made a key and wondering what to do with it? Chapter 14 walks through using it — including letting Claude Code read your numbers for you, and getting your cost of goods per day right (14.6).

Chapter 11

Products

Two pages most clients rarely need. Worth knowing they exist.

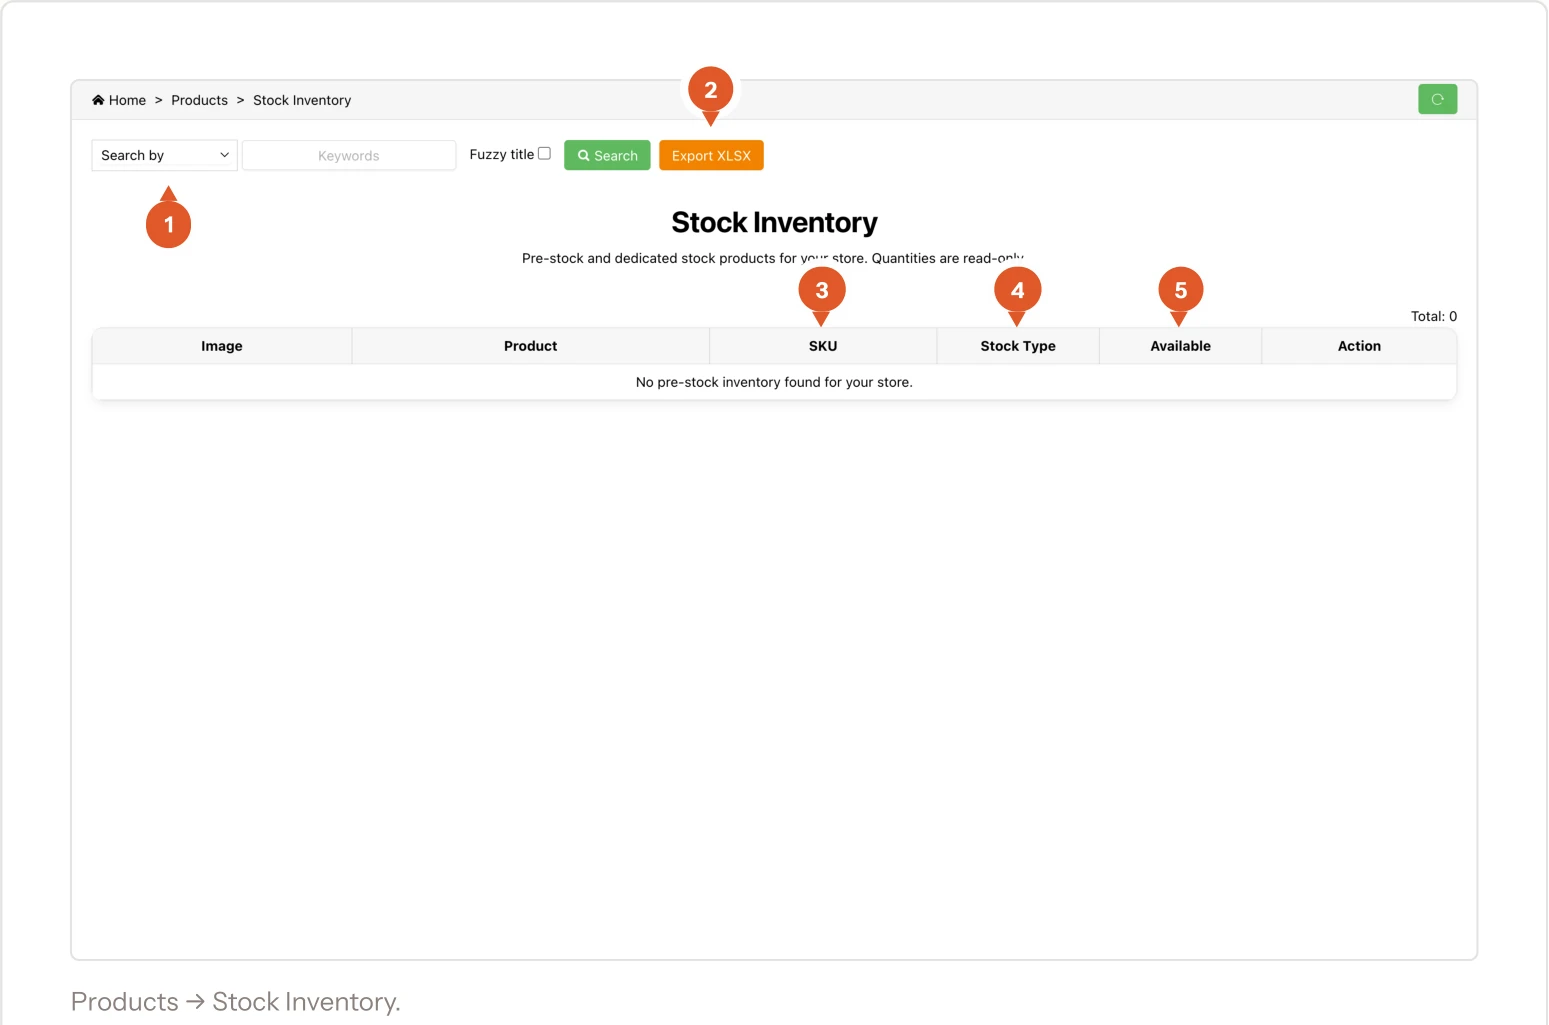
11.1Stock Inventory

If you've pre-stocked units with us — bought a batch up front to ship faster — this is where you see how many are left. Read-only: the quantities move as orders ship. Empty is normal if you haven't pre-stocked anything.

The Stock Inventory page with search, export and an empty stock table
Products → Stock Inventory.
  1. Search. By product or SKU.
  2. Export XLSX. The stock list as a spreadsheet.
  3. SKU. The code identifying the exact variant.
  4. Stock Type. Whether it's general pre-stock or reserved for you.
  5. Available. Units ready to ship right now.

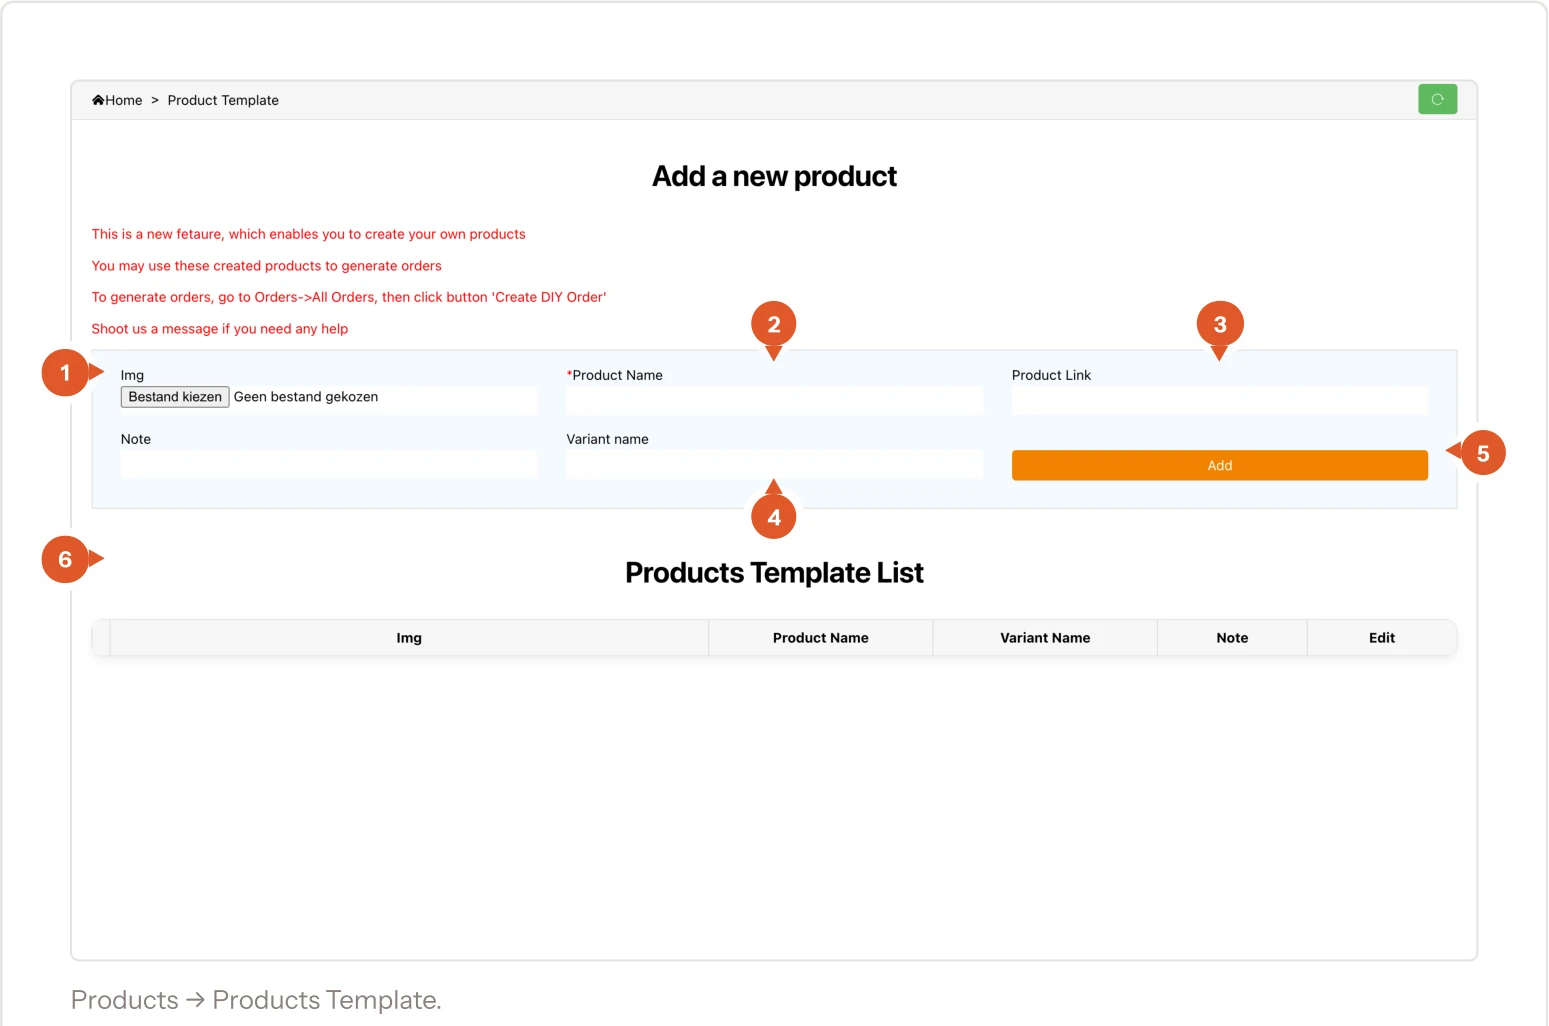
11.2Products Template

A product you create by hand, for orders that don't come from your webshop — a wholesale order, a replacement, a sample. Create the product here, then use Create DIY Order on the orders page to build the order around it.

The Products Template form with image, product name, link, note and variant fields
Products → Products Template.
  1. Image. Upload a photo so we know what to source.
  2. Product name. Required.
  3. Product Link. A link to the product, ideally AliExpress.
  4. Variant. Size, colour, whatever distinguishes it.
  5. Add. Saves it to your list below.
  6. Products Template List. Everything you've created, editable afterwards.

Chapter 12

A day in the dashboard

You don't need to work this dashboard. You need to check it.

12.1Every day — two minutes

  • Balance. Home screen. Still comfortably positive? Good, move on.
  • Address Error. Orders → All Orders, look at the chip. Anything above zero: open it, read the address, fix it in your webshop.
  • Product Confirmation → Pending. Anything waiting on your approval blocks sourcing.
  • The two counters in the top bar. A red number means an unread message or an address problem.

12.2Every week — ten minutes

  • Top up so you're a week or two ahead. Don't wait for the balance to go red.
  • Trace → Processing > 5 days. Anything sitting there, ask about it.
  • Quotation → Pending Quote. Products still without a price are orders waiting to happen.
  • Trace → Delivery Failed and Alert. Catch these before the customer emails you.

12.3When you add a new product to your store

  • Quotation → Quotation → Get Shopify Products to pull it over.
  • No price yet? Batch Request Price, or the New quote form (8.3).
  • When the price comes back, Confirm it.
  • Only then start advertising it. A product without a confirmed price can't be fulfilled.

12.4Every month

  • Payments → Daily Cost, set the month, Export. That's your bookkeeping file.
  • Payments → Order Cost, Export Invoice if you need invoice documents.
  • Spot-check a few orders' Paid amount against your selling price to see whether the margin is still what you think it is.

Chapter 13

Reference and help

Label translations, our shared Slack channel, and how to reach a human.

13.1If your screen is in Dutch

The dashboard can be shown in several languages, and some accounts have a mixed English/Dutch interface. If your screen doesn't match the screenshots here, this table translates the labels you'll run into.

Alle Orders
All Orders
Prijsaanvragen
Quotation
Nieuwe prijsaanvraag
New quote
Financiën
Payments
Winkelpakket
Store Package
Bekijk order
View Order
Zoeken
Search
Zoekwoord
Keyword
Klantnaam
Customer name
Land
Country
Datum aangemaakt
Create time
Datum betaald
Paid time
Datum verstuurd
Shipping time
Betaald
Paid
Deels betaald
Partially paid
Terugbetaald
Refunded
Annuleer
Cancelled
Afgewezen
Voided
Geautoriseerd
Authorised
Bedrag
Amount
Balans
Balance
Opmerking
Remark
Afbeelding
Image
Bewerking
Edit
Afmelden
Sign out
Opslaan
Save
Verstuur
Submit
Voeg bijlage toe
Add attachment
Bestand kiezen
Choose file
Domein
Domain name
Maak een DIY-bestelling
Create DIY Order
Exporteer factuur
Export Invoice

13.2Getting help

Stuck on something this documentation doesn't cover? Message your Shipgoods contact with the order number or a screenshot. Almost everything is faster to solve on our side than to hunt down on yours.

WhatsApp
Your account manager. The fastest route for anything about a live order.
Email
ship@shipgoods.eu — best for credentials, invoices and anything with an attachment.
Phone
+31 6 25689179
In the dashboard
Read feedback on an order line opens the message thread for that specific order.

13.3Shipgoods in your Slack

We work with you in a shared channel. You add us to a channel in your own Slack, and because we join as an outside organisation through Slack Connect, our people stay on our Slack bill — never on yours.

€0
Slack bills each organisation for its own people. In a Slack Connect channel we are external members, so we sit on the Shipgoods plan.
Any number of us
One of us or ten of us. External members never count toward your Slack invoice, however many join the channel.
One rule
Use the address we give you. That is the only thing standing between free and billable.

13.4Adding us to your channel

Four steps in your own Slack, about a minute.

Open or create the channelPick the channel you want to work in, or make a new one — #shipgoods is a good name. It cannot be #general: Slack does not allow outside members in there.
Click the member iconsTop right of the channel, next to the headphones and the search icon.
The top bar of a Slack channel, with the member icons at the right
The top of your channel — the member icons sit on the right.
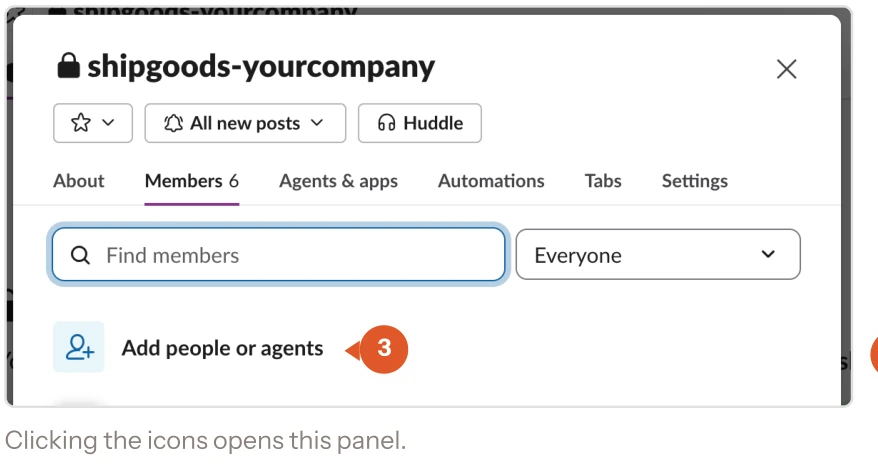
Click Add people or agentsThe panel that opens shows who is in the channel. The button sits under the search box.
The Slack channel panel on the Members tab, with Add people or agents highlighted
Clicking the icons opens this panel.
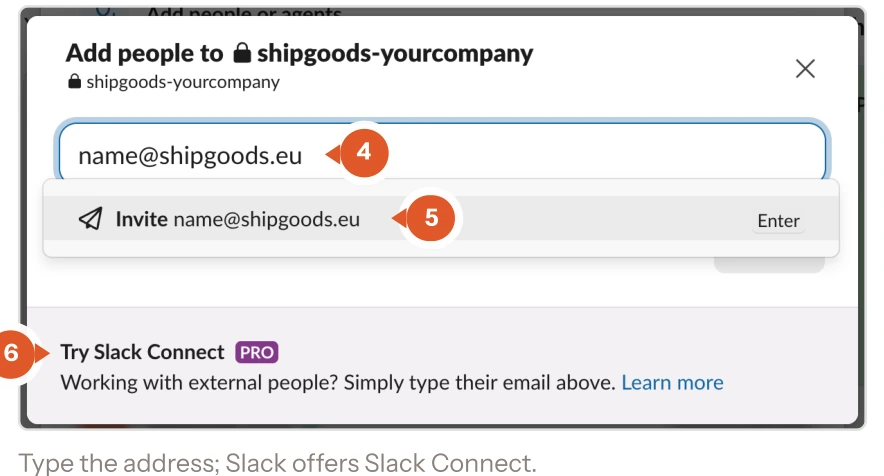
Type our address and send itYour contact's address, ending in @shipgoods.eu. Slack offers Invite name@shipgoods.eu — press Enter, and Slack confirms it goes out as a Slack Connect invitation. We accept from our side, usually the same day.
The Slack invite dialog with a shipgoods.eu address typed in and the Slack Connect note underneath
Type the address; Slack offers Slack Connect.
  1. The address. It must end in @shipgoods.eu — that is what tells Slack we are an outside organisation.
  2. Invite. Slack offers Invite name@shipgoods.eu. Press Enter.
  3. Slack Connect. Slack confirms this goes out as a Slack Connect invitation. That line is how you know it will not cost you anything.

13.5If the Slack invite doesn't work

Slack won't let you send it
Free workspaces can accept a Slack Connect invitation but not send one. Message us and we will send you one instead — that works on any plan.
Your admin has to approve it
Many workspaces route outside invitations past an admin first. Ask yours to approve it.
It won't work in #general
Outside members cannot join #general. Use a separate channel, for example #shipgoods.
The invitation expired
Slack Connect invitations time out if nobody accepts. Send a fresh one and tell us — we accept the same day.

Chapter 14

Using the API

Optional. Your own numbers, on tap — through Claude Code, a spreadsheet or a script.

14.1What the API is for

Everything the dashboard shows you is also available as data, at an address your own tools can read. The usual reason to want that: letting Claude Code fetch your numbers so you can ask “what did my goods cost per day last week?” in plain language, or pulling them into the spreadsheet you already run your business from.

This chapter is optional and a little technical. Nothing in the dashboard needs it. The Claude Code route in 14.3 needs no technical knowledge — only copy and paste.

14.2Get your key

In the dashboard go to Store → API Keys, give the key a name you will recognise later, and press Create API Key. The walkthrough of that page is in 10.4.

14.3Connect Claude Code

The API wants your key sent along with every request, in a header. A normal chat — claude.ai, the Claude app’s chat, ChatGPT — cannot do that. You need Claude Code: the version of Claude that runs commands on your own computer, and so can send the key.

  1. 01Get Claude CodeIt needs a paid Claude plan — Pro or higher; the free plan does not include it. Easiest: install the Claude desktop app from claude.com/download and open the Code tab. In a terminal instead: curl -fsSL https://claude.ai/install.sh | bash. Official instructions: code.claude.com/docs/en/setup.
  2. 02Paste the promptStart a new session and paste the block below, with your own key where it says YOUR_KEY. The key stays in that conversation on your own computer — don’t paste it into a shared chat.
  3. 03Ask awayClaude Code fetches the numbers itself each time you ask, so the answers are current.
I have a read-only analytics API from my fulfilment partner Shipgoods.
Base URL: https://dashboard.shipgoods.eu/api/v1/shop/analytics/<endpoint>
Every request needs the header  Authorization: Bearer YOUR_KEY

Follow these rules exactly:
- Use curl for the requests (a web fetch tool cannot send the key).
- Always also send the header  Accept-Language: en  (without it some tools get HTTP 500).
- Endpoints: summary, order-volume, order-status, order-trend, order-costs, payments, alerts.
- Costs per day: always per store. Use order-trend with &shop_admin_id=<id>, or add up order-costs. Get the store ids from order-volume. Never use account-wide spend or payments as costs: those include my top-ups.
- Amounts are whole currency units, not cents. Costs are negative, refunds positive.
- date_from and date_to: at most 90 days per request, both days counted.
- per_page: at most 100. Follow pagination.total_pages and stop at an empty page.

Start with summary and order-volume. Tell me my stores, and what my goods cost per day, per store, over the last 7 days.

Replace YOUR_KEY before sending. Leave the rest as it is — every rule prevents a mistake we have seen.

After that you ask for things the way you would ask a colleague:

  • “What did my goods cost per day last week, per store?”
  • “Which of my stores is running best right now?”
  • “How many address errors are still open?”
  • “What is my balance, and at this spend how many days does it last?”

14.4What you can ask for

Seven endpoints, all a plain GET with your key in an Authorization: Bearer header. A successful answer starts with "code":0,"msg":"ok".

summary
Balance, order counts per period and the alert numbers — everything at once. Start here.
order-volume
The same counts, broken out per store — including each store’s shop_admin_id, which you need for costs.
order-status
How many orders sit in which status.
order-trend
Per day: orders, fulfilled orders and spend. Add &shop_admin_id= for one store, and read 14.6 before treating spend as costs.
order-costs
Every charge on its own line: date, store, order number and amount. description 4 is an order cost, 9 a refund.
payments
Per day, what went off or onto your balance — costs, top-ups and refunds together. Only days on which something happened.
alerts
Address errors, unread feedback and open tickets.

Anything with a period takes date_from and date_to as YYYY-MM-DD, at most 90 days apart with both days counted. Lists take page and per_page, at most 100 — ask for more and you quietly get 20.

To check a key by hand in a terminal, before wiring anything up:

curl -H "Authorization: Bearer YOUR_KEY" -H "Accept-Language: en" \
  https://dashboard.shipgoods.eu/api/v1/shop/analytics/summary

Works in any terminal, and inside Claude Code.

14.5If it doesn't work

It can’t connect, or the numbers look invented
You are in a normal chat, which cannot send your key. Use Claude Code — see 14.3.
401 invalid_token
The key has been revoked, or it was copied incompletely. Make a new one under Store → API Keys.
401 Missing or invalid Authorization header
The word Bearer is missing in front of the key, or the space between the two is.
500 and a “System Error” page
Your tool sends Accept-Language: *, which Node.js does by default. Send Accept-Language: en with every request.
42200 invalid_date_range
More than 90 days, or the dates the wrong way round. Watch out: today minus 90 days is 91 days.
Only 20 rows come back
per_page above 100 quietly falls back to 20. Use 100 and follow total_pages.
404
The endpoint name is misspelled. Only the seven names in 14.4 exist.
Costs that look far too low, or positive
You are reading account-wide figures, which include your top-ups. See 14.6.

Still stuck? Send us the endpoint you called and the error you got back — never the key itself. Contact details are in 13.2.

14.6Cost of goods per day

The question most people connect the API for, and the easiest one to get subtly wrong. The numbers are right; the trap is which number you read.

  1. 01Find your storesorder-volume lists them, each with its shop_admin_id.
  2. 02Ask per storeorder-trend?shop_admin_id=…&date_from=…&date_to=…spend is then that store’s cost of goods minus refunds, per day. Negative means you were charged, so flip the sign to get the cost.
  3. 03Or per orderorder-costs lists every charge separately. Added up per day and store, it lands on exactly the same figure — to the cent.
  4. 04Add the stores upYour total cost of a day is all your stores together.
  • Today shows 0. Costs are booked when an order is fulfilled, usually the next day.
  • Amounts are in whole euros, not cents. -39.41 is €39.41.
  • Prefer a spreadsheet? Ask your Shipgoods contact for our Google Sheets script. It does all of the above and fills a tab with your costs per day, per store.